macOS with VS Code and conda
Supplement, not a second guide
Follow Installation. This page adds only what is specific to macOS.
The reference machine has 64 GB RAM and 1 TB storage, but the bootcamp does not require that hardware. The official participant primer states that about 5 GB of free disk space and 8 GB RAM are sufficient, and that the exercises are designed to run on a laptop CPU. A GPU is not required.
This guide documents a local setup for attendees using a configuration similar to mine:
- MacBook with Apple Silicon (my reference machine: M1 Max)
- macOS with the default
zshshell - Visual Studio Code
- an existing conda installation
- a local project folder rather than Google Colab or a remote machine
| Author | Fabio Matanza |
| Last validated | 13 August 2026 |
| Validated by | Fabio Matanza |
| Hardware | M1 Max (64 GB RAM & 1TB storage) |
1. Open a native Apple Silicon terminal
Open Terminal.app from macOS. Do not start this first check from a Terminal application configured to run with Rosetta.
Run:
Both uname -m and arch must print:
If either command prints x86_64, stop here. The shell is running through Rosetta and could create an Intel Python environment. If x86_64: Open Finder, select the Terminal application, choose File → Get Info, disable Open using Rosetta, and reopen Terminal.
2. Check disk space and developer tools
Run:
Confirm that at least 5 GB is free. More headroom is preferable because conda keeps downloaded package caches.
If git or the command-line developer tools are missing, run:
Complete the macOS installer, then rerun:

3. Verify the existing conda installation
Run:
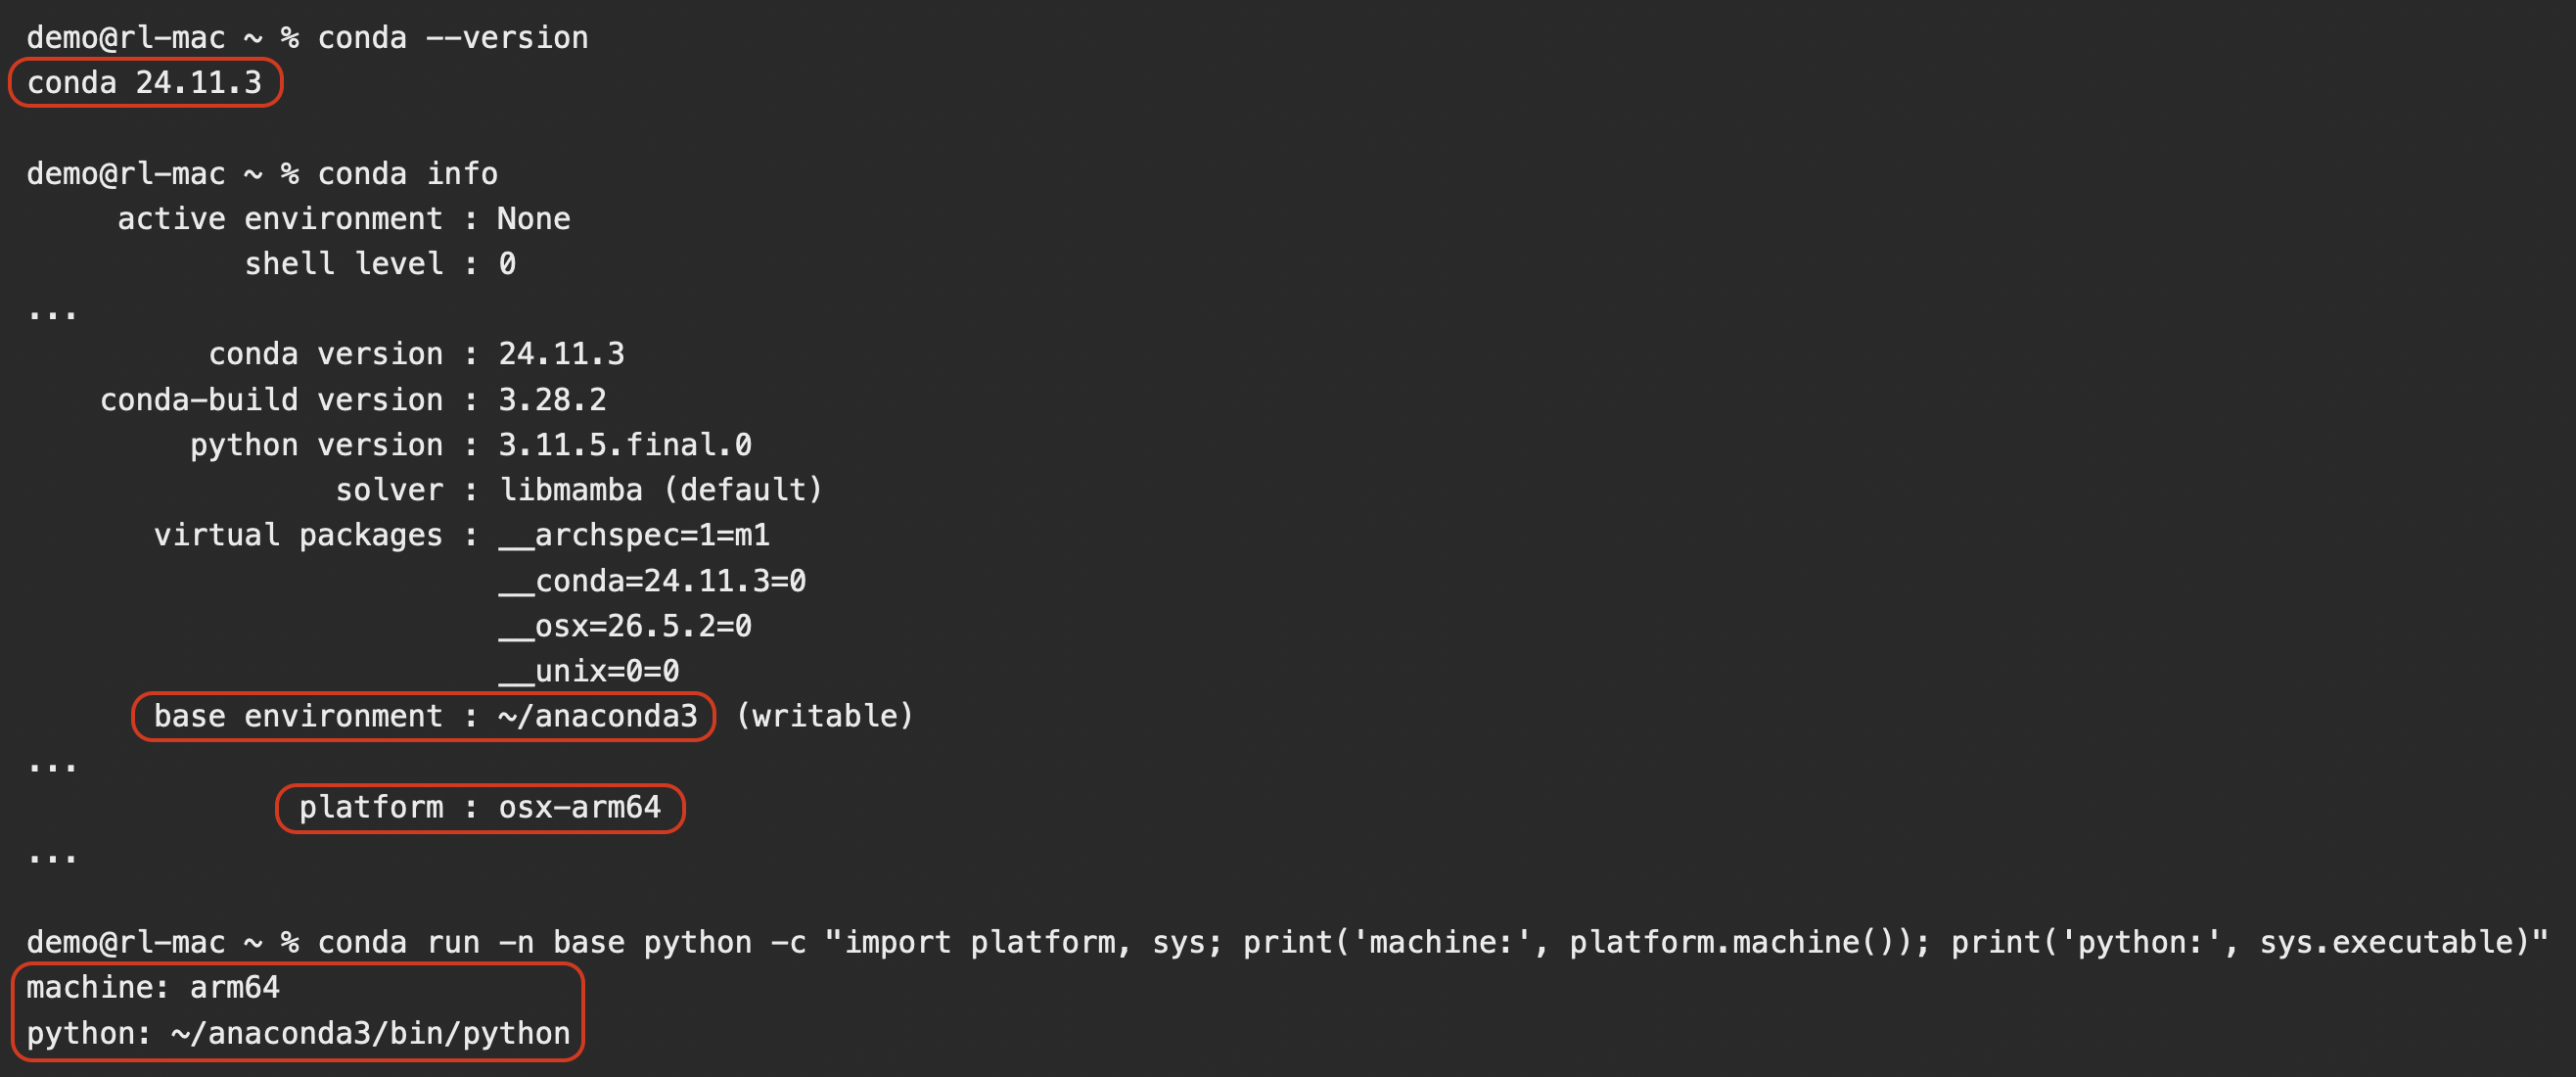
In conda info, verify:
platformmust beosx-arm64;conda info --baseshould point to the conda distribution you intend to use;- if several conda distributions are installed, make sure you are not accidentally using an old Intel installation.
The base path may resemble one of these examples:
The installation directory alone does not prove that conda is native Apple Silicon. Verify the architecture of the base-environment Python separately:conda run -n base python -c "import platform, sys; print('machine:', platform.machine()); print('python:', sys.executable)"
The machine line must say arm64.
If conda works and both checks show native Apple Silicon, keep the existing installation. Do not reinstall conda merely to follow this guide.
If conda works but is not initialised for zsh, run:
Close Terminal completely, open a new Terminal window, and verify:
Only if the installed conda stack is Intel x86_64
Install a native Apple Silicon Miniforge distribution and then recreate the bootcamp environment. The current Miniforge project recommends its official installer rather than a Homebrew-repackaged installation.
Download the native installer:
curl -fsSLo /tmp/Miniforge3-arm64.sh \
  "https://github.com/conda-forge/miniforge/releases/latest/download/Miniforge3-MacOSX-arm64.sh"
bash /tmp/Miniforge3-arm64.sh -b -p "$HOME/miniforge3-arm64"
source "$HOME/miniforge3-arm64/etc/profile.d/conda.sh"
conda init zsh
Close and reopen Terminal, then run:
conda info --base
conda info
conda run -n base python -c "import platform; print(platform.machine())"
Confirm that:
conda info --basepoints to~/miniforge3-arm64;platformisosx-arm64;- the base-environment Python reports
arm64.
4. Check VS Code and install the required extensions
Run:
If the code command is not found:
- Open VS Code.
- Press Cmd+Shift+P.
- Search for and select Shell Command: Install 'code' command in PATH.
- Close and reopen Terminal.
- Run
code --versionagain.
You should see an output like that after running 5. :
We are still in the Terminal. Install or update (automatically by using --install-extension) the Python and Jupyter extensions:
code --install-extension ms-python.python
code --install-extension ms-toolsai.jupyter
code --list-extensions | sort
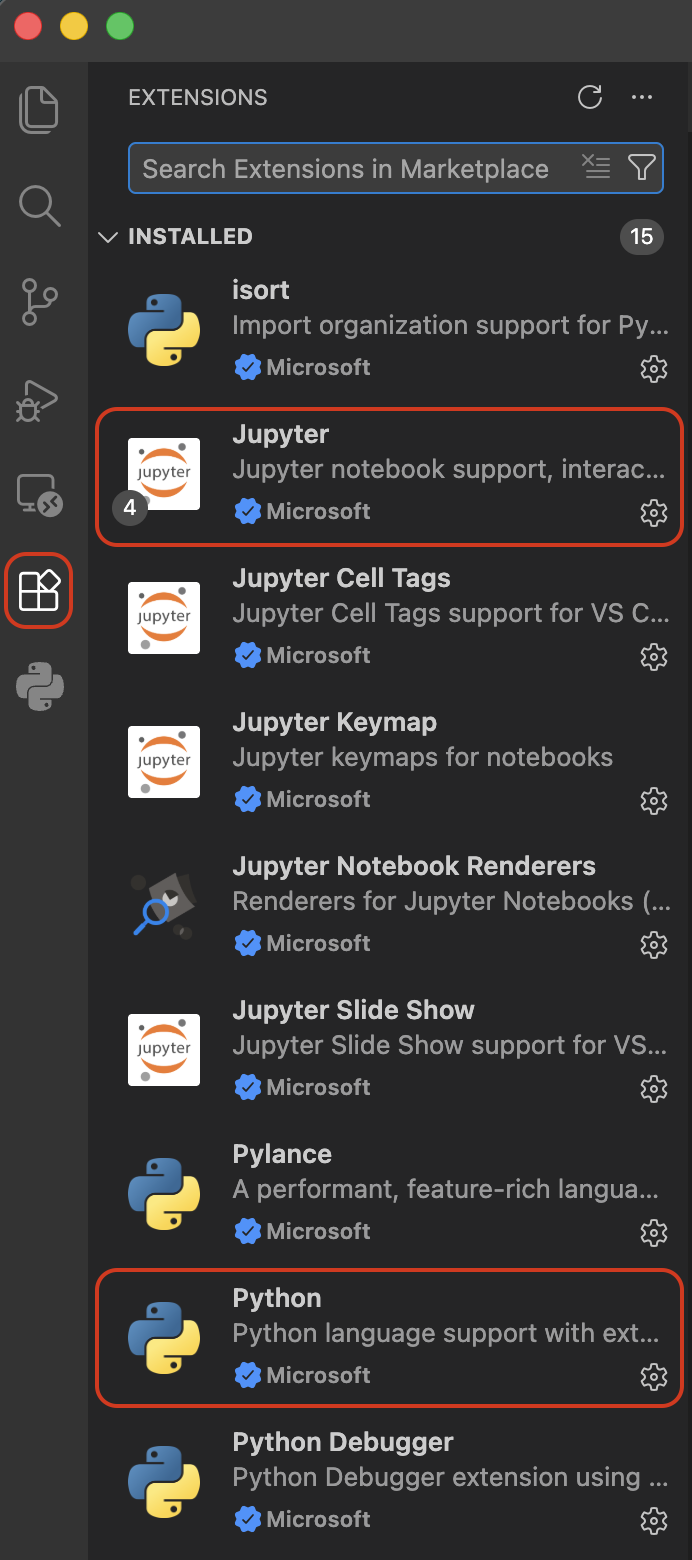
The list must contain:
5. Create a local bootcamp folder and clone the repository
The following path keeps all bootcamp material below ~/Projects/rl-bootcamp. Change it before running the commands if you prefer another parent folder.
mkdir -p "$HOME/Projects/rl-bootcamp"
cd "$HOME/Projects/rl-bootcamp"
git clone https://github.com/SARL-PLUS/rl-bootcamp-setup.git
cd rl-bootcamp-setup
git remote -v
git status --short --branch
Expected repository location:
Expected git outputs:
demo@rl-mac ~/Projects/rl-bootcamp/rl-bootcamp-setup % git remote -v
origin  https://github.com/SARL-PLUS/rl-bootcamp-setup.git (fetch)
origin  https://github.com/SARL-PLUS/rl-bootcamp-setup.git (push)

demo@rl-mac ~/Projects/rl-bootcamp/rl-bootcamp-setup % git status --short --branch
## main...origin/main
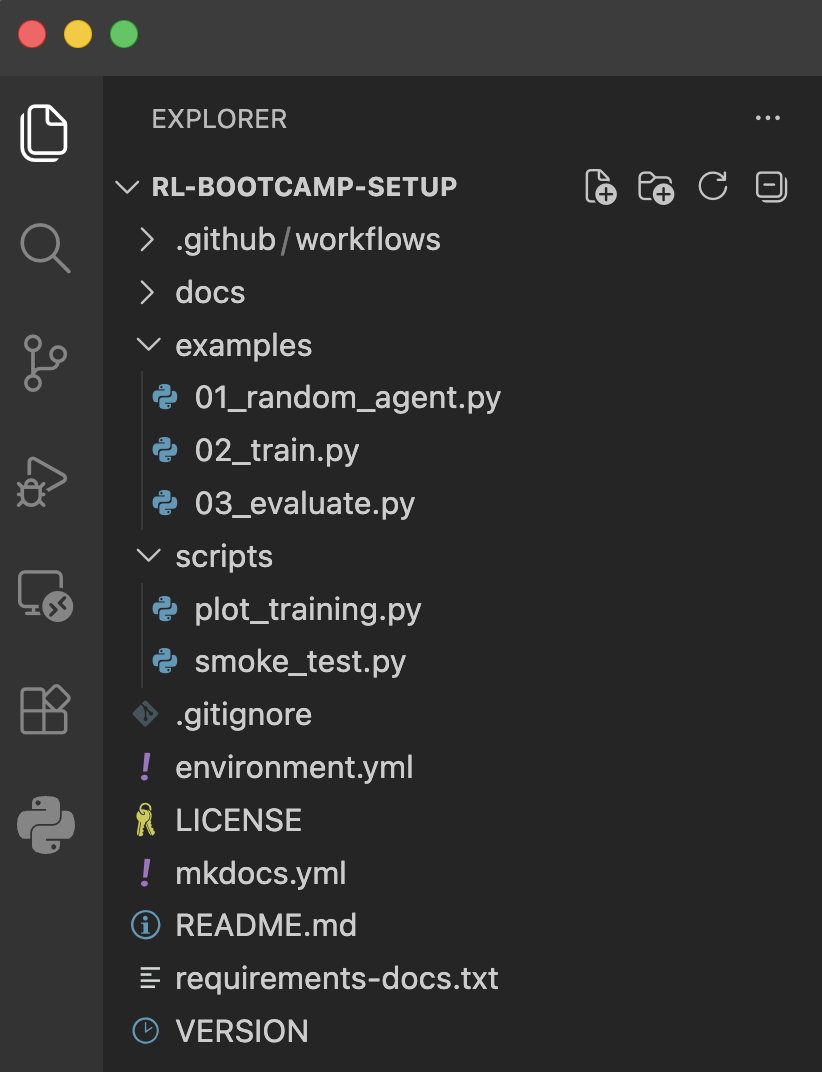
Confirm that the important files are present:
You should see at least:
./environment.yml
./examples/01_random_agent.py
./examples/02_train.py
./examples/03_evaluate.py
./scripts/smoke_test.py
Run code . in the Terminal to open the repository as one VS Code workspace:
If the code shell command is unavailable, use:
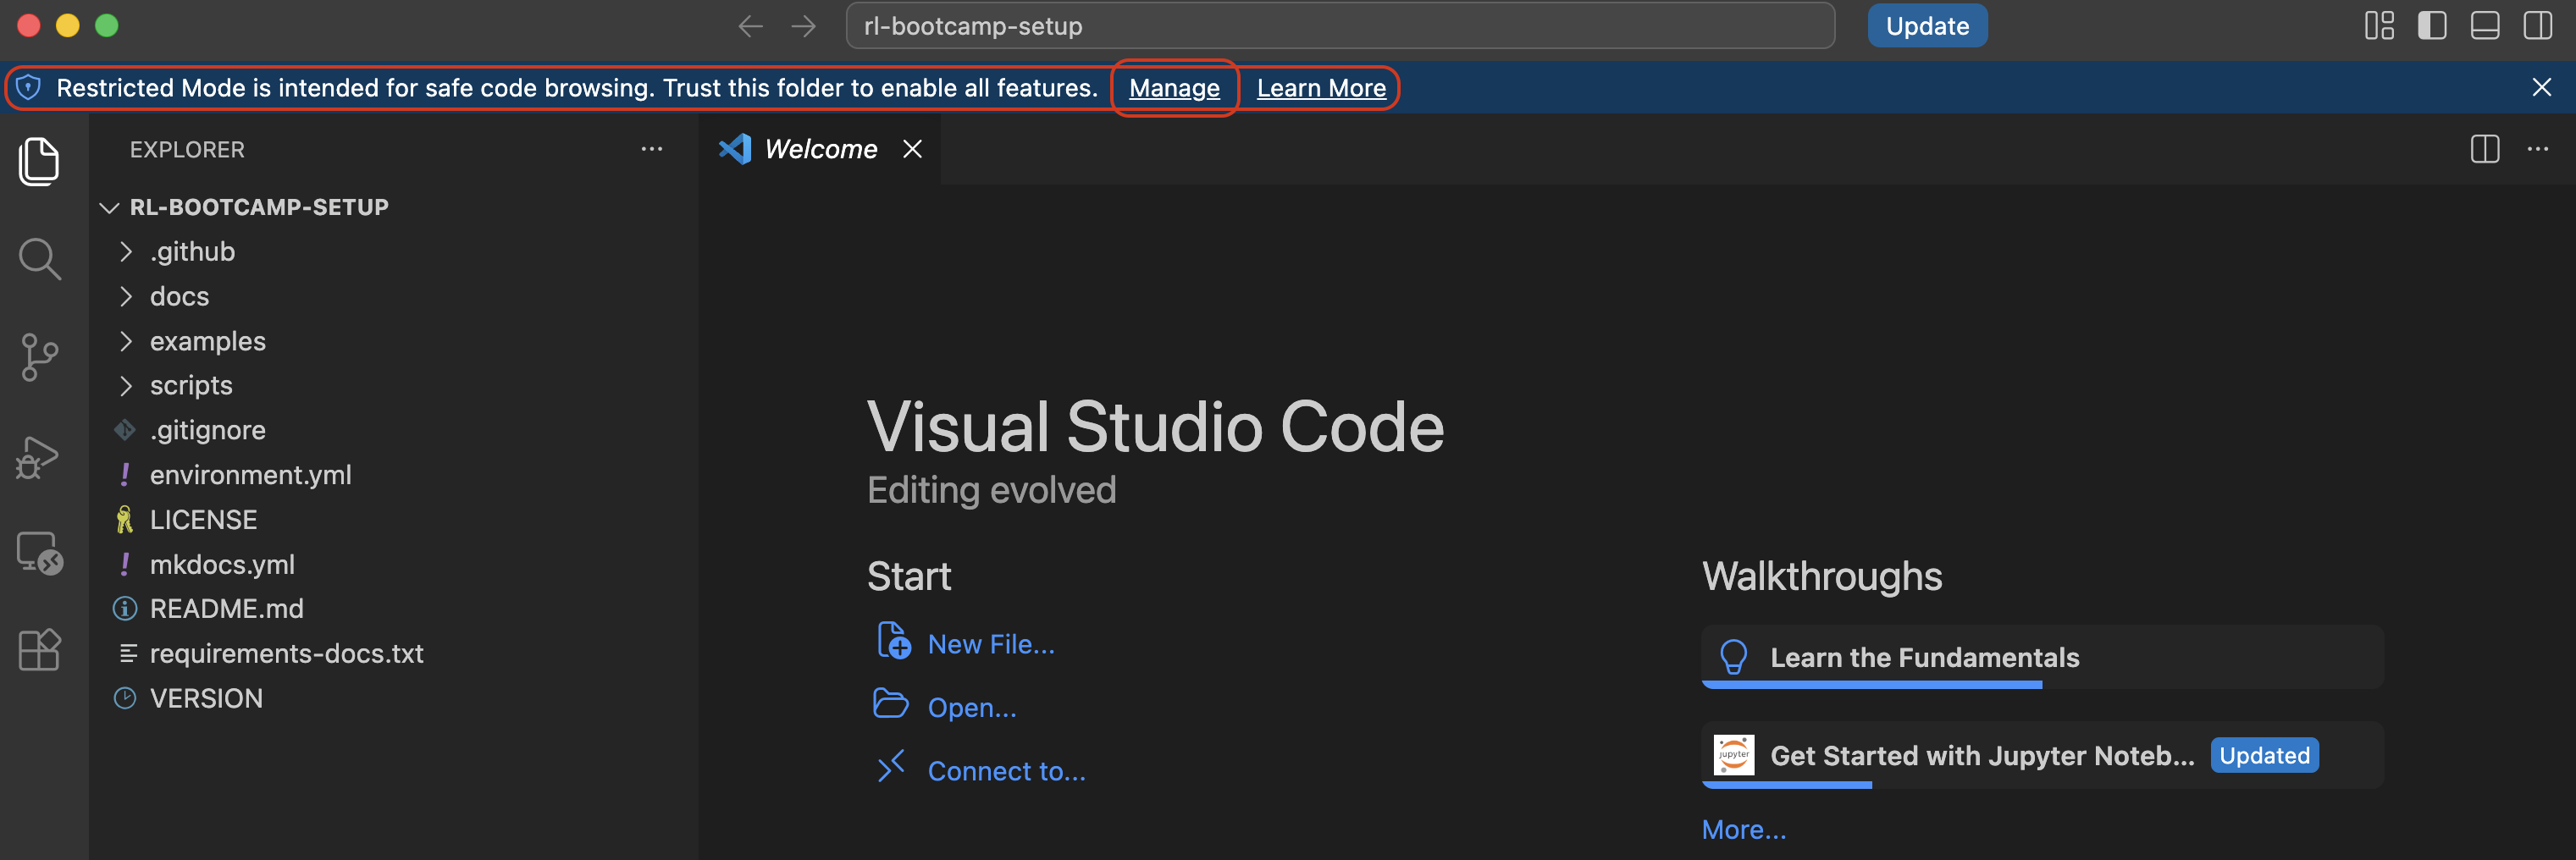
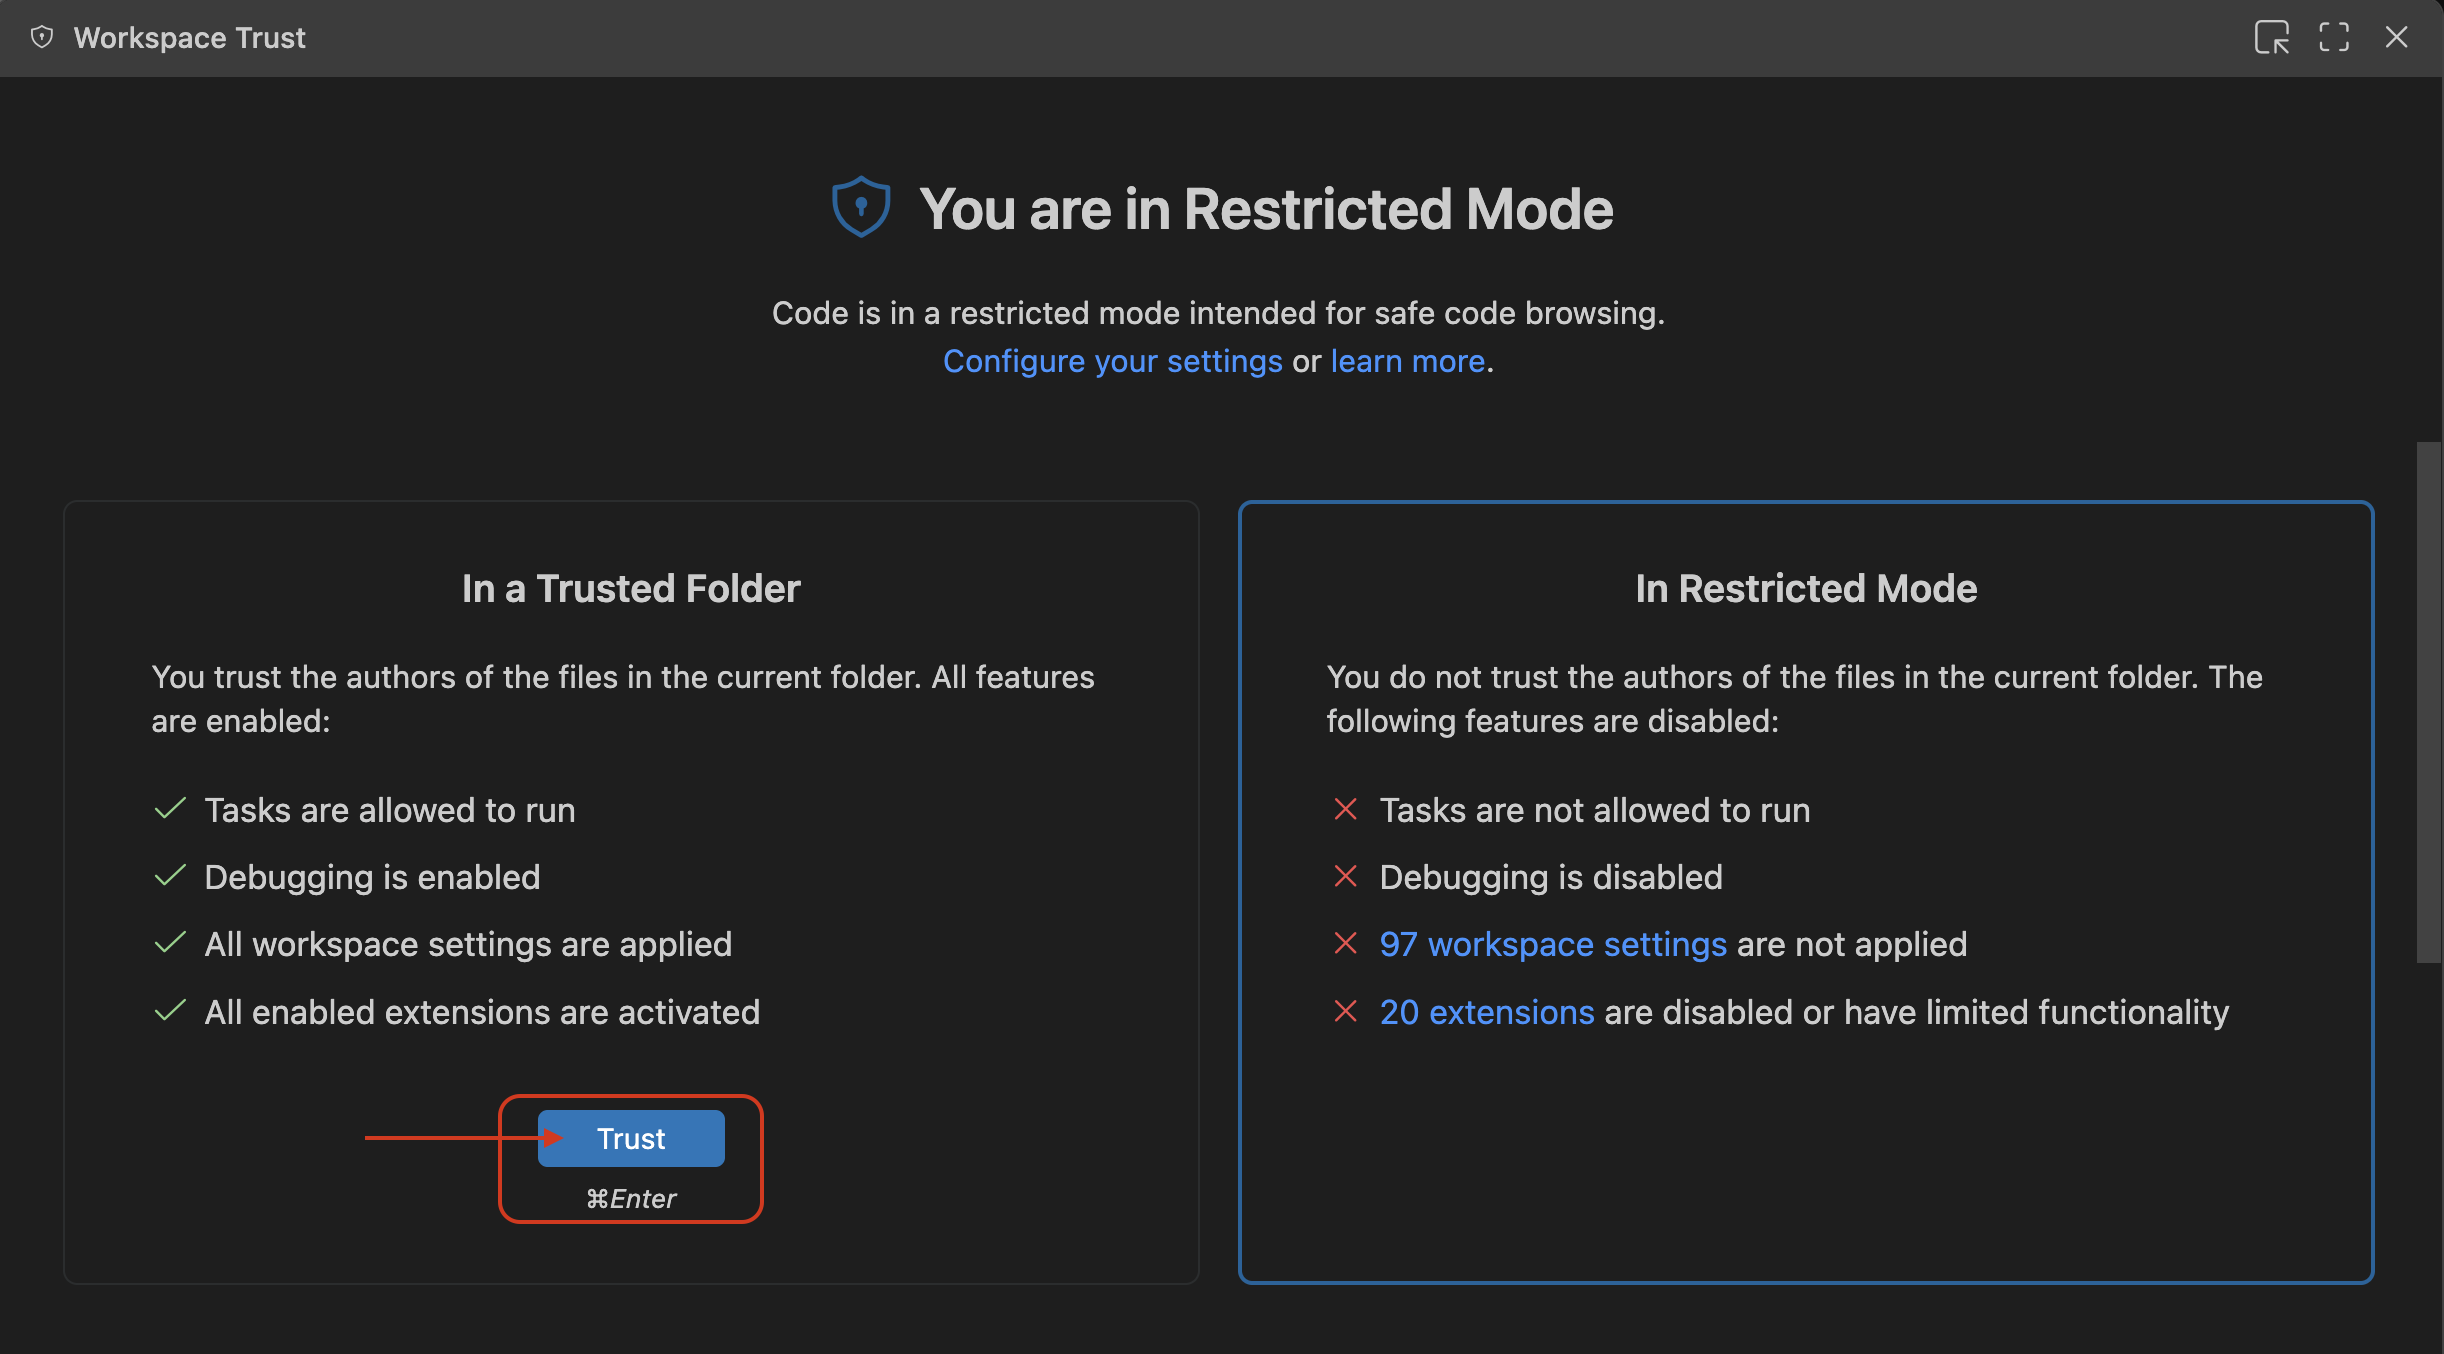
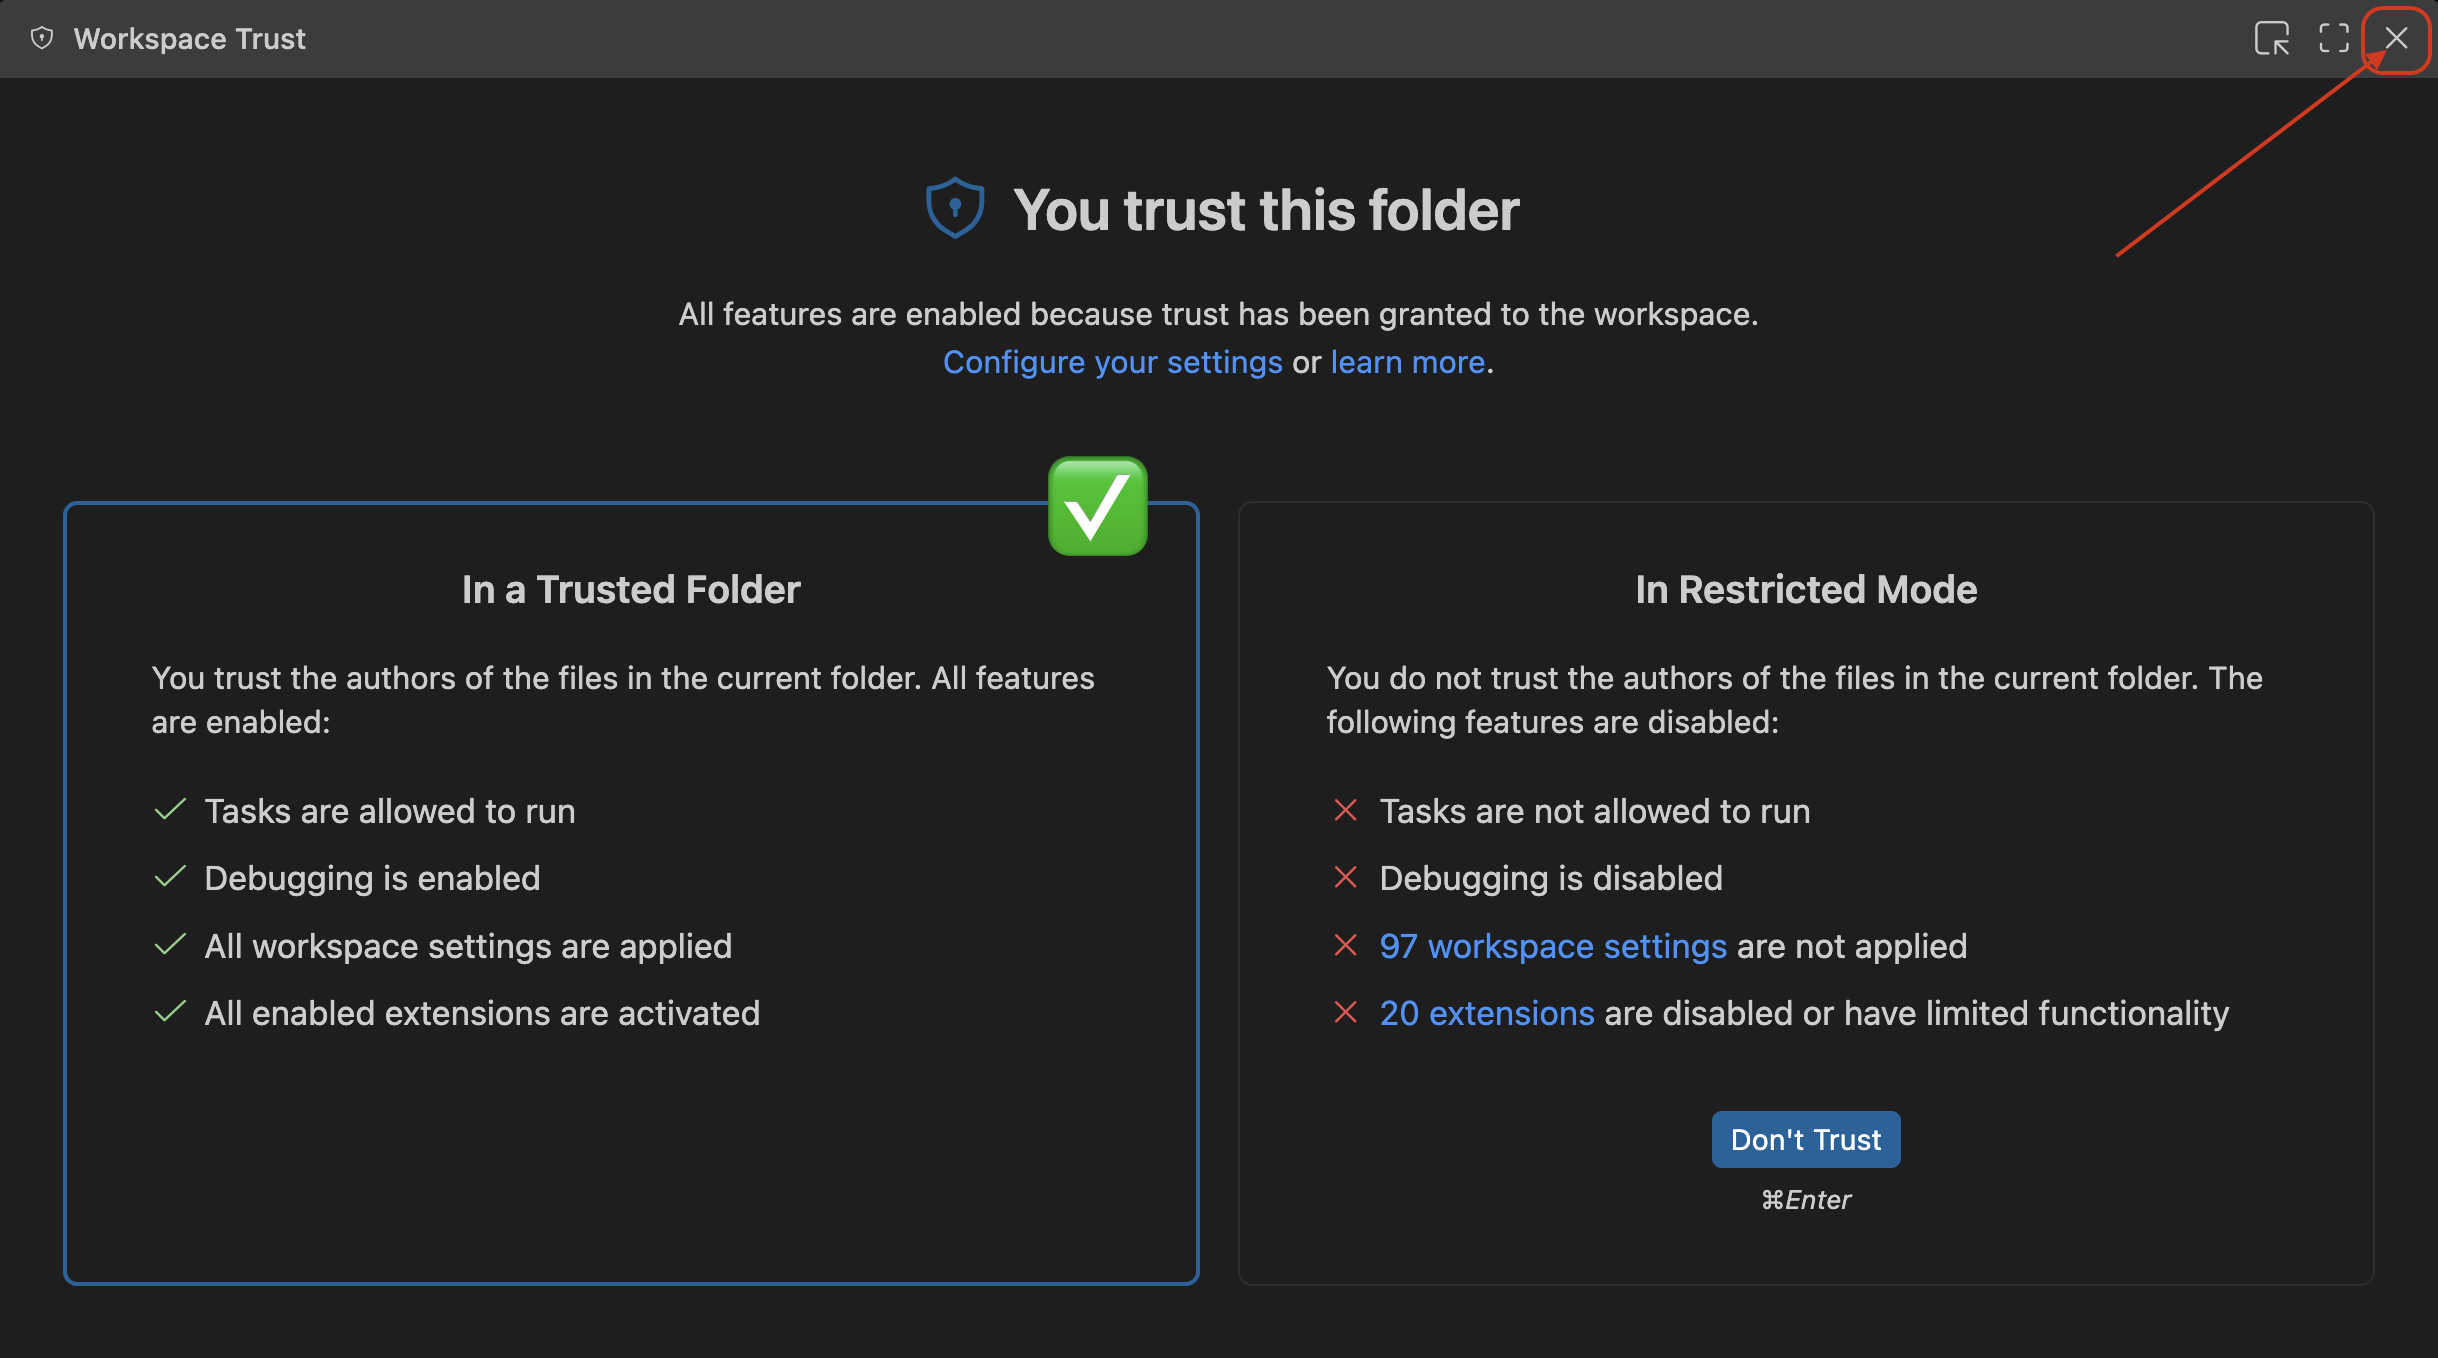
VS Code may initially open the repository in Restricted Mode. Before trusting
the workspace, verify that git remote -v points to the official
SARL-PLUS/rl-bootcamp-setup repository. Then select Manage → Trust to
enable the Python and Jupyter extensions.
Only trust a folder whose source you recognise.
6. Create the bootcamp conda environment
The supplied environment.yml defines the complete rlbootcamp environment with Python 3.12 and all required scientific, reinforcement-learning, notebook, rendering, and evaluation dependencies (conda-forge followed by pip).
First check whether an environment named rlbootcamp already exists:
If rlbootcamp does not exist, create it:
If an old or incomplete rlbootcamp environment already exists and contains no work you need to preserve, recreate it cleanly:
If you want to keep an existing rlbootcamp you might opt for updating it instead:
Environment creation can take some time, don't worry. Do not interrupt it while packages are being downloaded or installed.
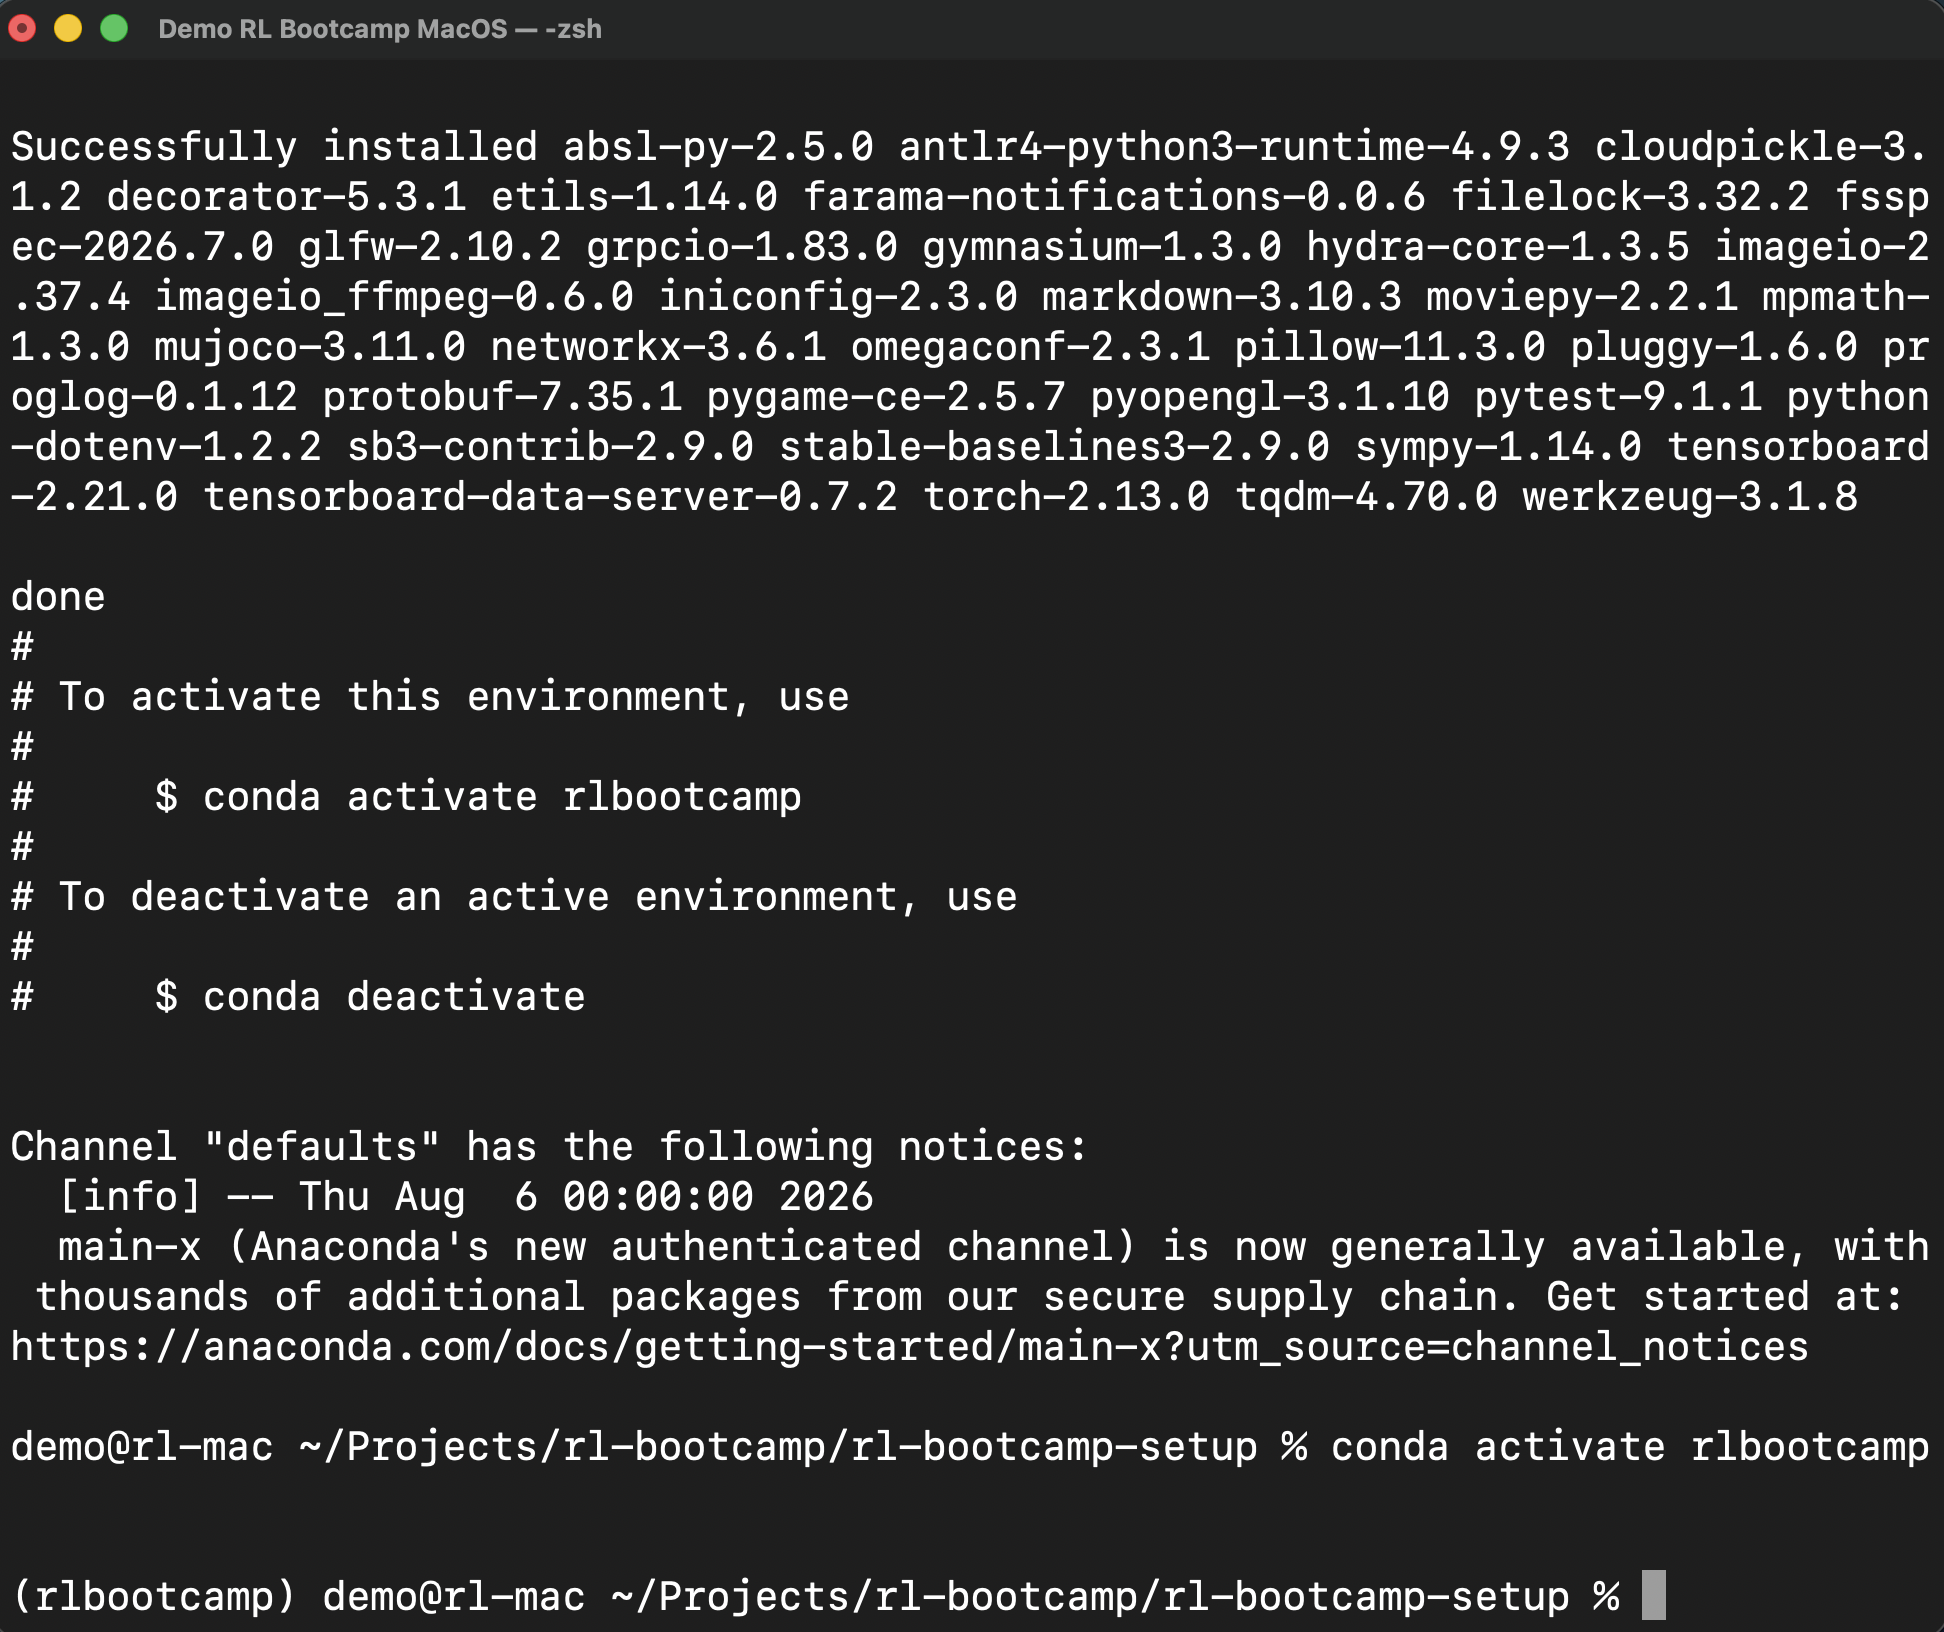
Activate the finished environment:
The shell prompt should now begin with:
7. Verify Python, package health, and Apple Silicon architecture
With rlbootcamp active, run:
echo "$CONDA_DEFAULT_ENV"
python --version
python -c "import platform, sys; print('machine:', platform.machine()); print('python:', sys.executable)"
python -m pip check
Expected conditions:
CONDA_DEFAULT_ENVisrlbootcamp;- Python is version 3.12.x;
machineisarm64and the Python path contains~/anaconda3/envs/rlbootcamp/bin/python;pip checkreports no broken requirements.
Check the main packages without assuming exact patch versions:
python -c "import gymnasium, mujoco, numpy, stable_baselines3, torch; print('gymnasium', gymnasium.__version__); print('mujoco', mujoco.__version__); print('numpy', numpy.__version__); print('stable-baselines3', stable_baselines3.__version__); print('torch', torch.__version__); print('torch MPS available', torch.backends.mps.is_available())"
ffmpeg -version | head -n 3
The bootcamp examples deliberately use the CPU for small MLP policies. torch MPS available may be True, but MPS is not required for this setup.
(rlbootcamp) demo@rl-mac ~/Projects/rl-bootcamp/rl-bootcamp-setup % echo "$CONDA_DEFAULT_ENV"
rlbootcamp
(rlbootcamp) demo@rl-mac ~/Projects/rl-bootcamp/rl-bootcamp-setup % python --version
Python 3.12.13
(rlbootcamp) demo@rl-mac ~/Projects/rl-bootcamp/rl-bootcamp-setup % python -c "import platform, sys; print('machine:', platform.machine()); print('python:', sys.executable)"
machine: arm64
python: ~/anaconda3/envs/rlbootcamp/bin/python
(rlbootcamp) demo@rl-mac ~/Projects/rl-bootcamp/rl-bootcamp-setup % python -m pip check
No broken requirements found.
(rlbootcamp) demo@rl-mac ~/Projects/rl-bootcamp/rl-bootcamp-setup % python -c "import gymnasium, mujoco, numpy, stable_baselines3, torch; print('gymnasium', gymnasium.__version__); print('mujoco', mujoco.__version__); print('numpy', numpy.__version__); print('stable-baselines3', stable_baselines3.__version__); print('torch', torch.__version__); print('torch MPS available', torch.backends.mps.is_available())"
gymnasium 1.3.0
mujoco 3.11.0
numpy 2.5.1
stable-baselines3 2.9.0
torch 2.13.0
torch MPS available True
(rlbootcamp) demo@rl-mac ~/Projects/rl-bootcamp/rl-bootcamp-setup % ffmpeg -version | head -n 3
ffmpeg version 8.1.2 Copyright (c) 2000-2026 the FFmpeg developers
built with clang version 19.1.7
configuration: ...
...
...
8. Select the rlbootcamp interpreter in VS Code
In VS Code:
- Press Cmd+Shift+P.
- Search for and select Python: Select Interpreter.
- Select the conda interpreter named
rlbootcamp (3.12.13) ~/anaconda3/envs/rlbootcamp/bin/python - If it is not listed, choose Enter interpreter path and select the path printed by:
- You may notice the new
.vscode/folder in your repo, don't worry it's absolutely normal - Close any old VS Code terminal.
- Create a new terminal with Terminal → New Terminal. (you find it by hovering to the top of your screen)
In the new VS Code terminal, run:
echo "$CONDA_DEFAULT_ENV"
python -c "import platform, sys; print(platform.machine()); print(sys.executable)"
The new integrated terminal should activate rlbootcamp automatically. The VS Code status bar should show the selected rlbootcamp Python 3.12 interpreter.
(rlbootcamp) demo@rl-mac ~/Projects/rl-bootcamp/rl-bootcamp-setup % echo "$CONDA_DEFAULT_ENV"
rlbootcamp
(rlbootcamp) demo@rl-mac ~/Projects/rl-bootcamp/rl-bootcamp-setup % python -c "import platform, sys; print(platform.machine()); print(sys.executable)"
arm64
~/anaconda3/envs/rlbootcamp/bin/python
9. Register the Jupyter kernel
VS Code Terminal: Register the environment once:
# if not already active
conda activate rlbootcamp
python -m ipykernel install --user --name rlbootcamp --display-name "Python (rlbootcamp)"
jupyter kernelspec list
You should see something similar to this:
(rlbootcamp) demo@rl-mac ~/Projects/rl-bootcamp/rl-bootcamp-setup % python -m ipykernel install --user --name rlbootcamp --display-name "Python (rlbootcamp)"
Installed kernelspec rlbootcamp in ~/Library/Jupyter/kernels/rlbootcamp
(rlbootcamp) demo@rl-mac ~/Projects/rl-bootcamp/rl-bootcamp-setup % jupyter kernelspec list
Available kernels:
python3 ~/anaconda3/envs/rlbootcamp/share/jupyter/kernels/python3
rlbootcamp ~/Library/Jupyter/kernels/rlbootcamp
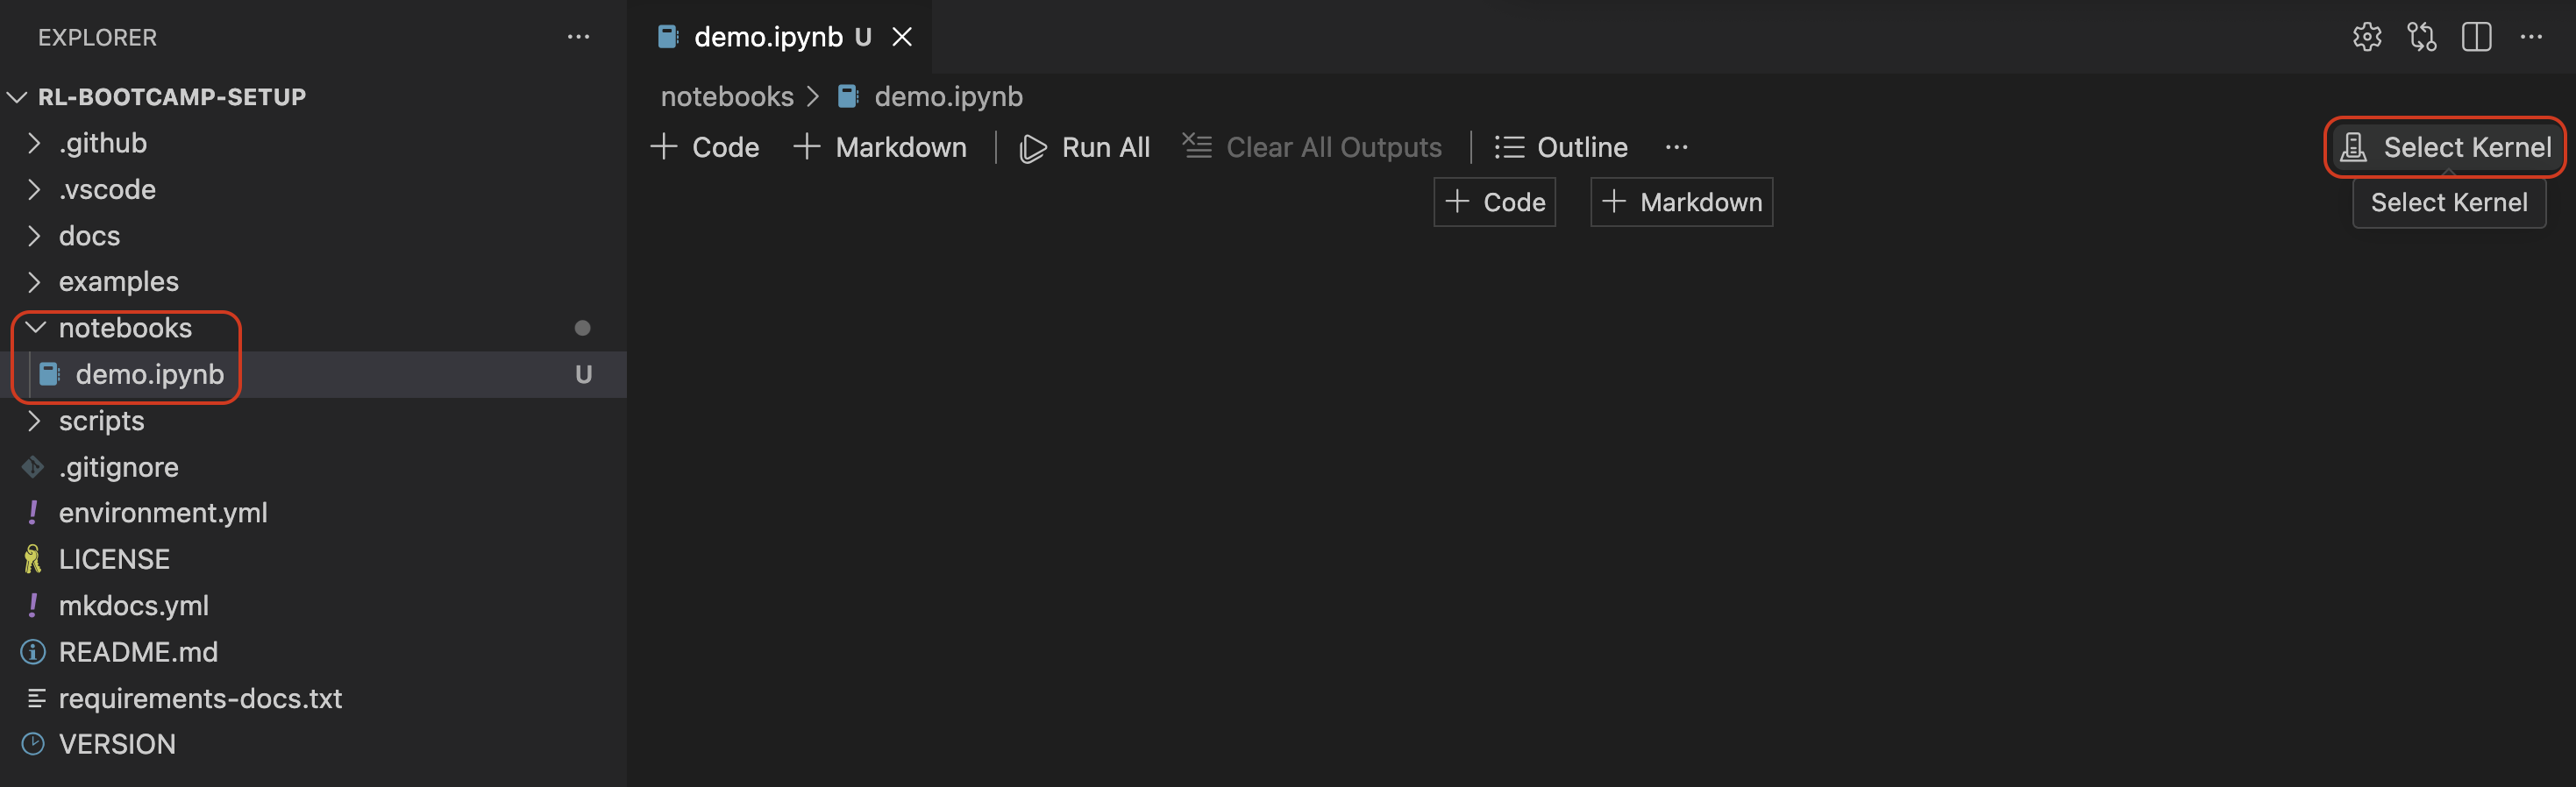
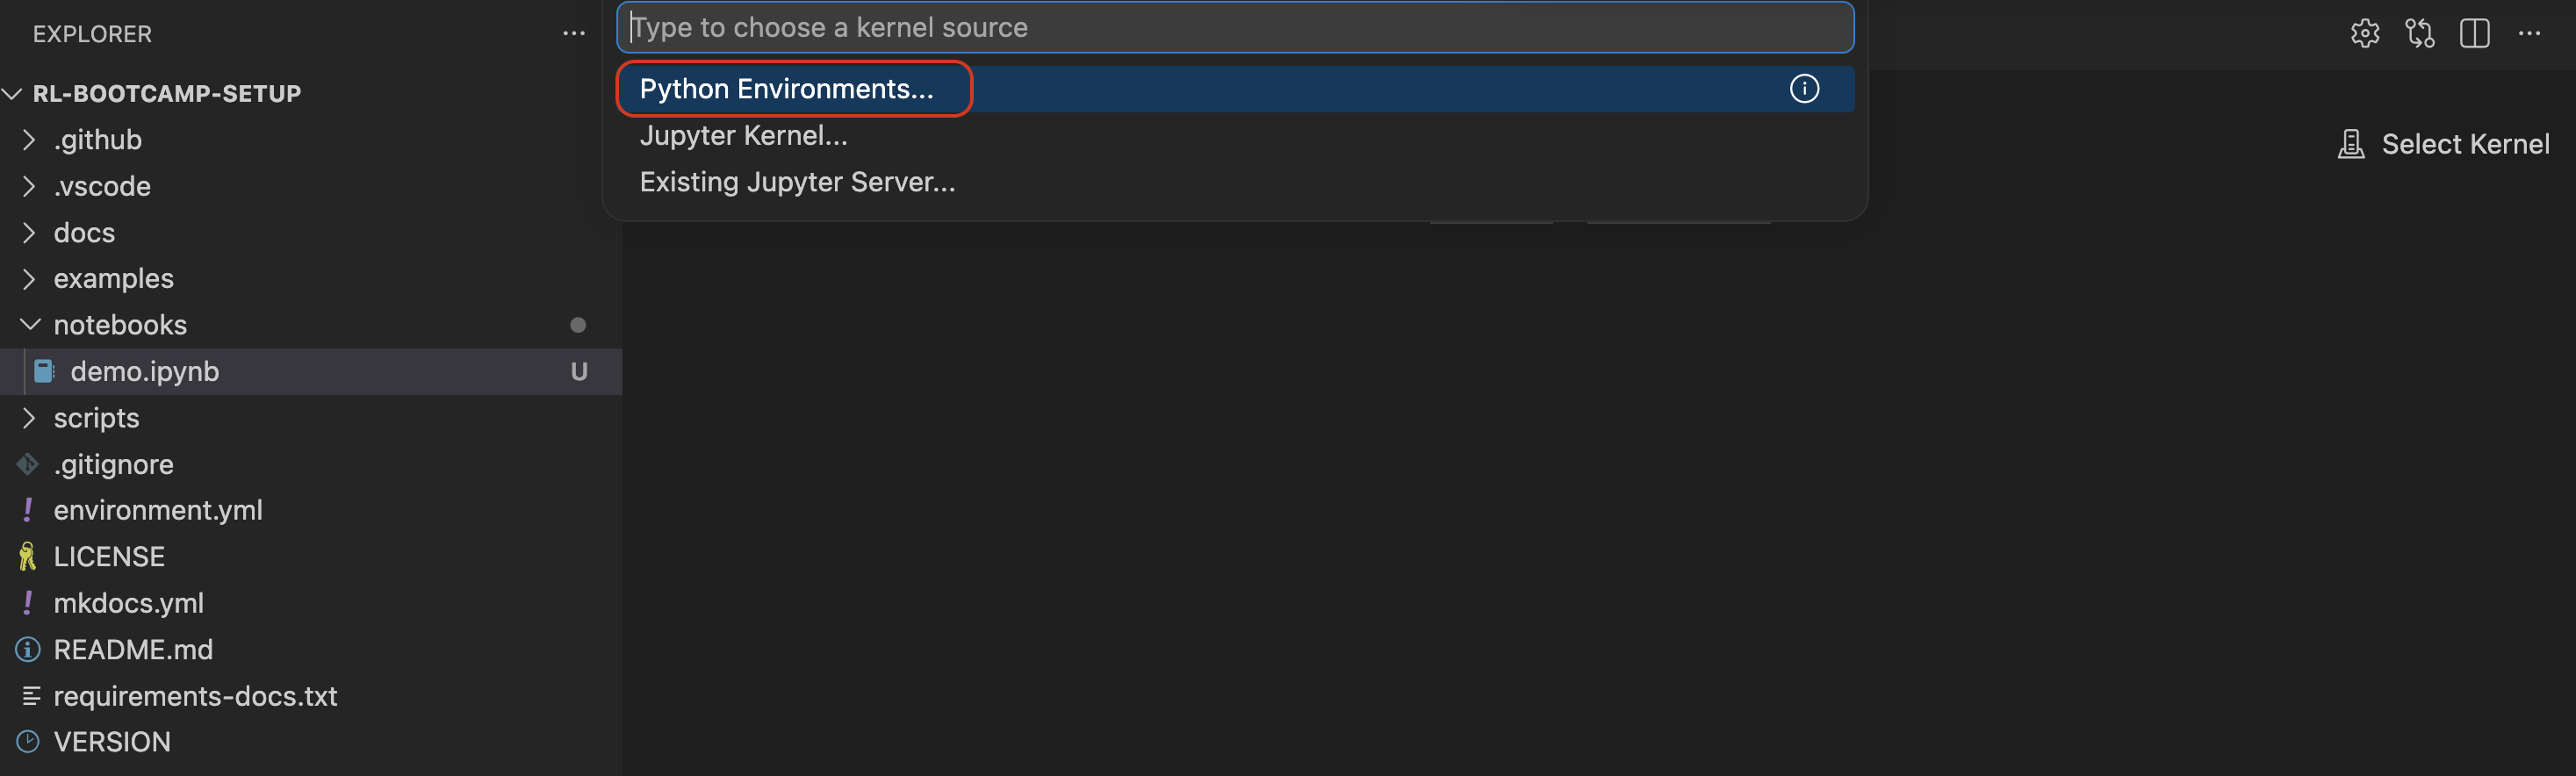
Now create a valid notebook in VS Code:
- Press Cmd+Shift+P.
- Search for and select Jupyter: Create New Blank Notebook.
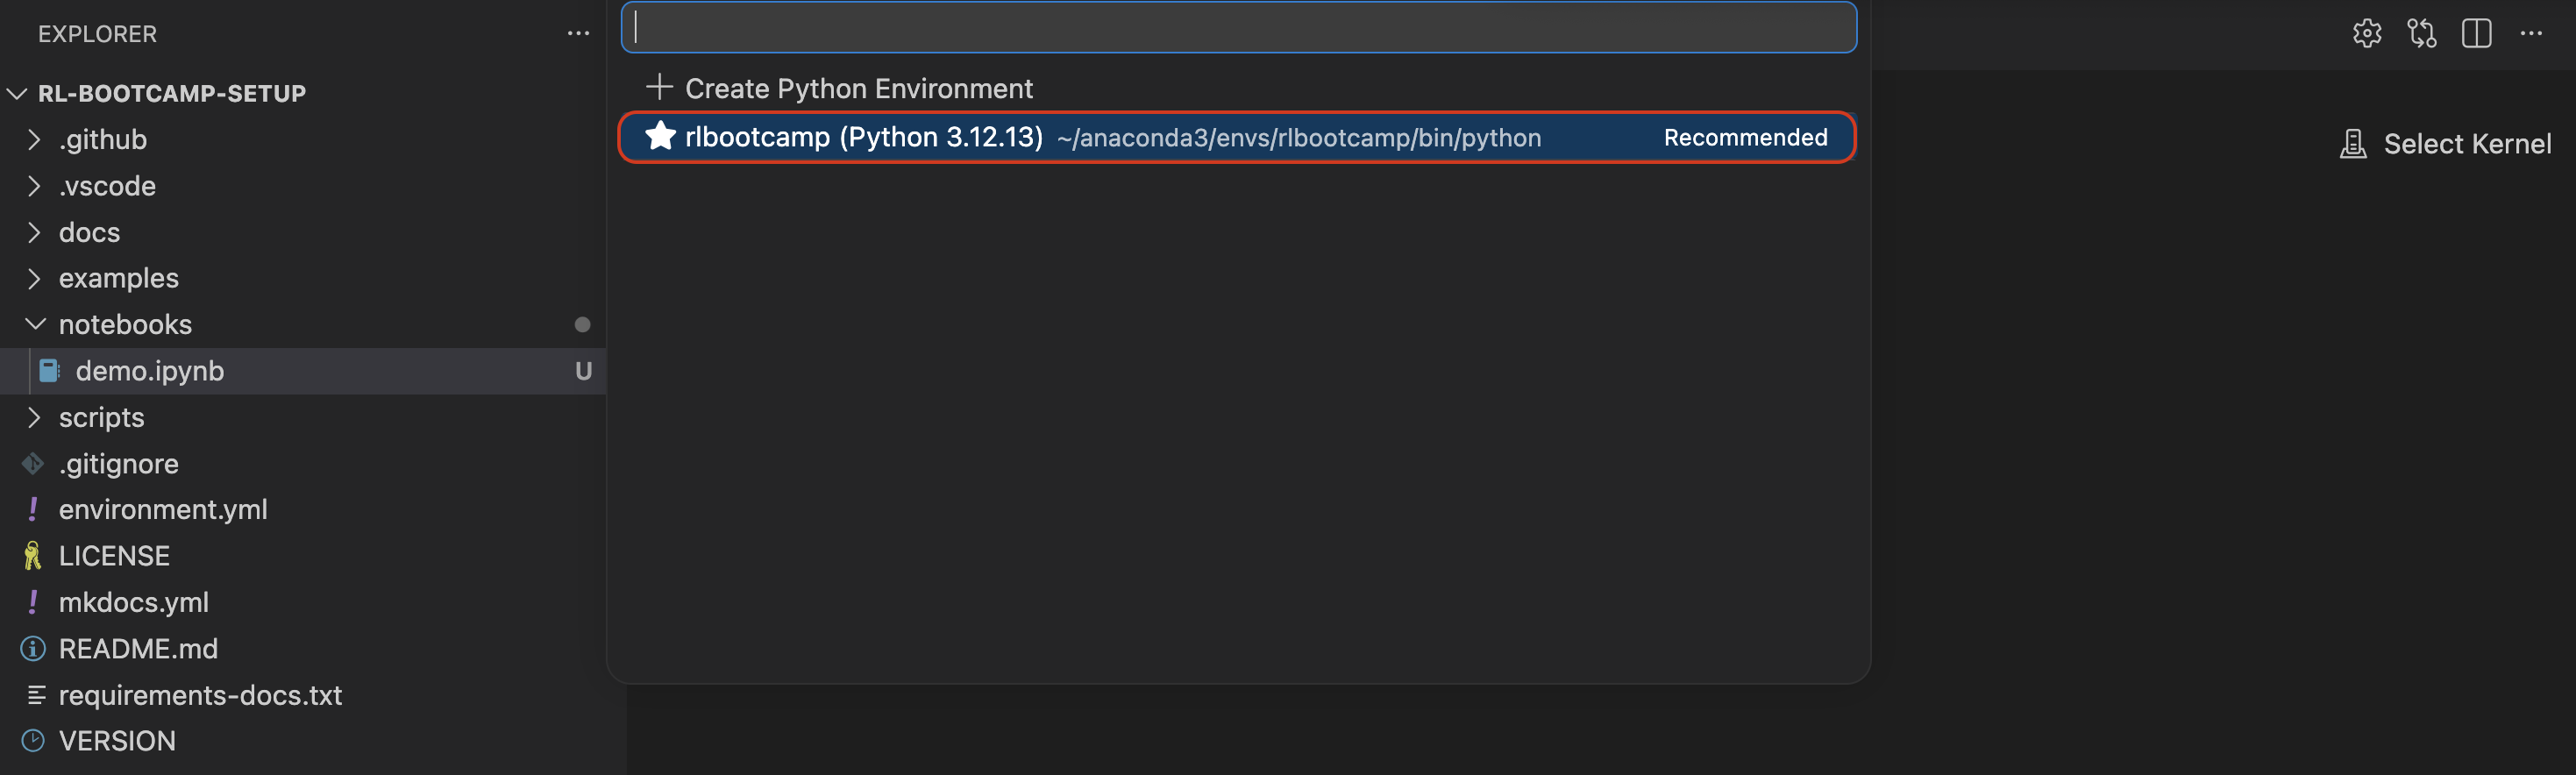
- Choose the Python (rlbootcamp) kernel.
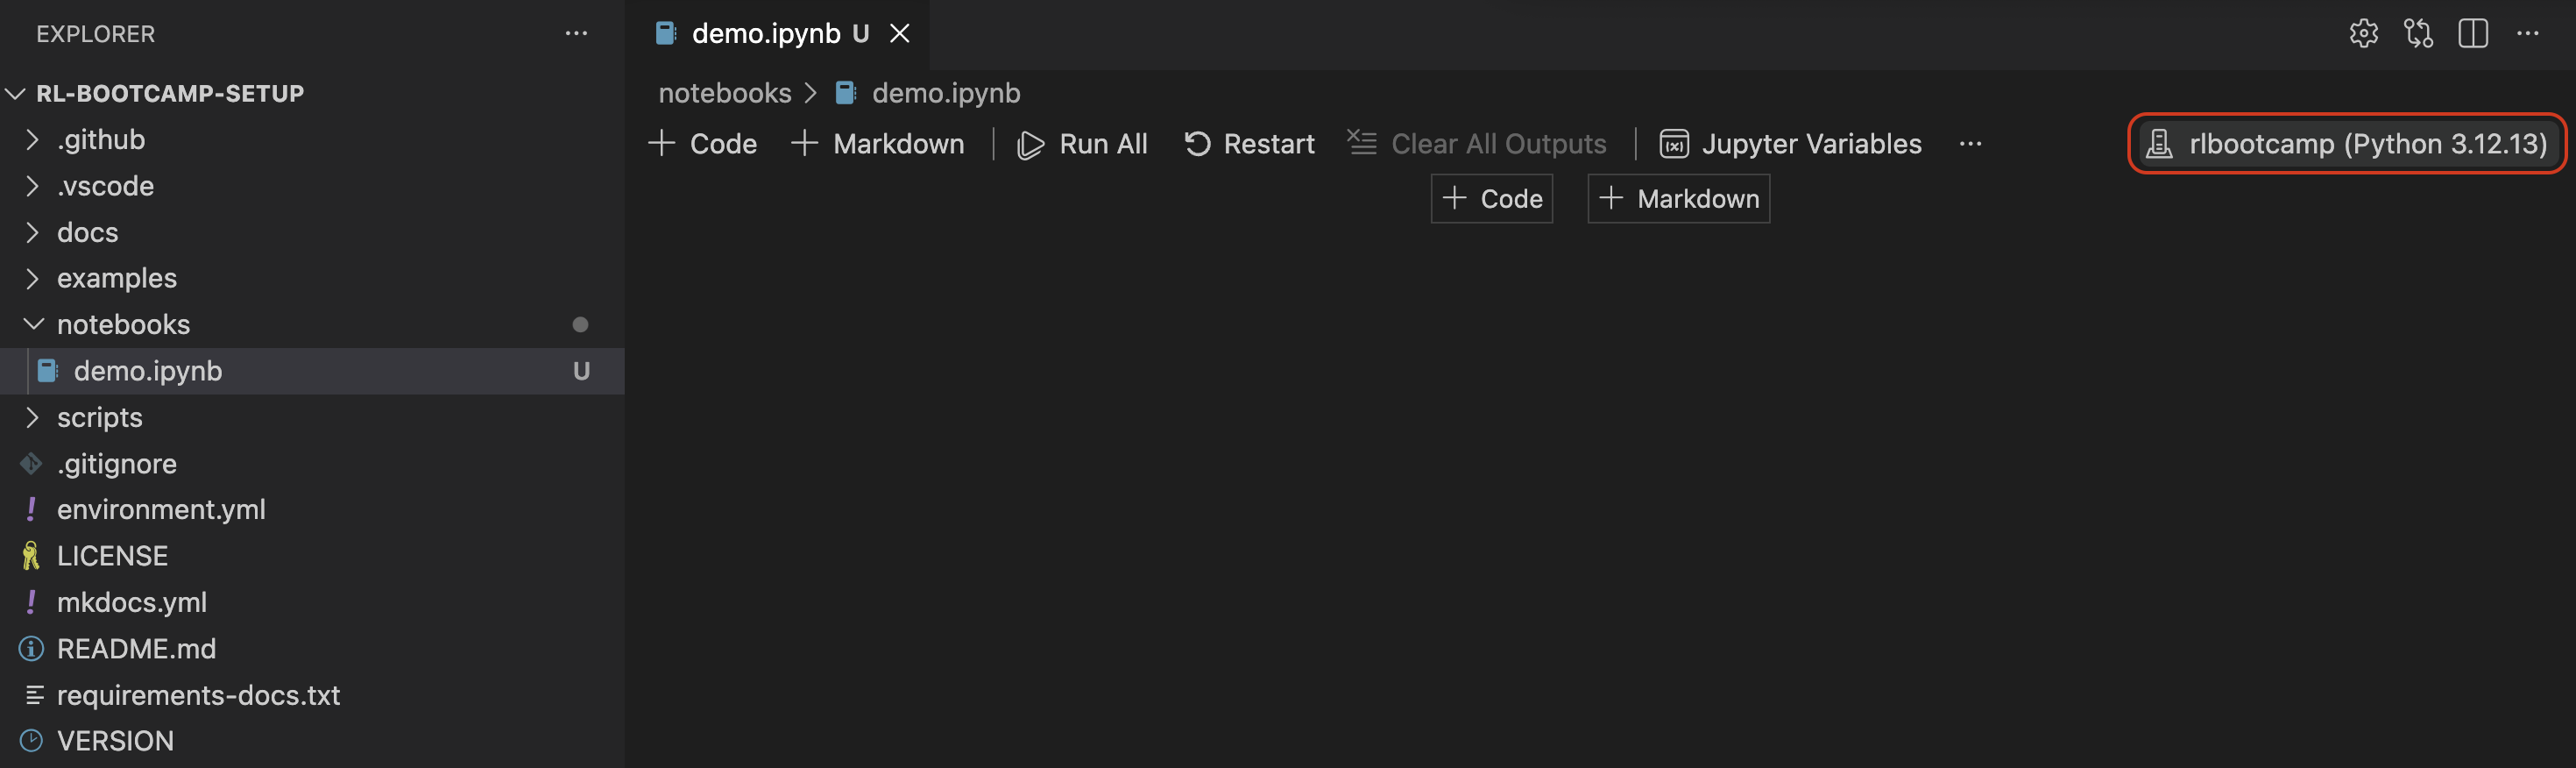
- Save the notebook as
notebooks/demo.ipynb.
For any notebook opened in VS Code, select Python (rlbootcamp) from the kernel menu in the upper-right corner. Terminal activation and notebook kernel selection are separate choices.
Optional JupyterLab check:
Stop JupyterLab with Ctrl+C after verifying that it starts.
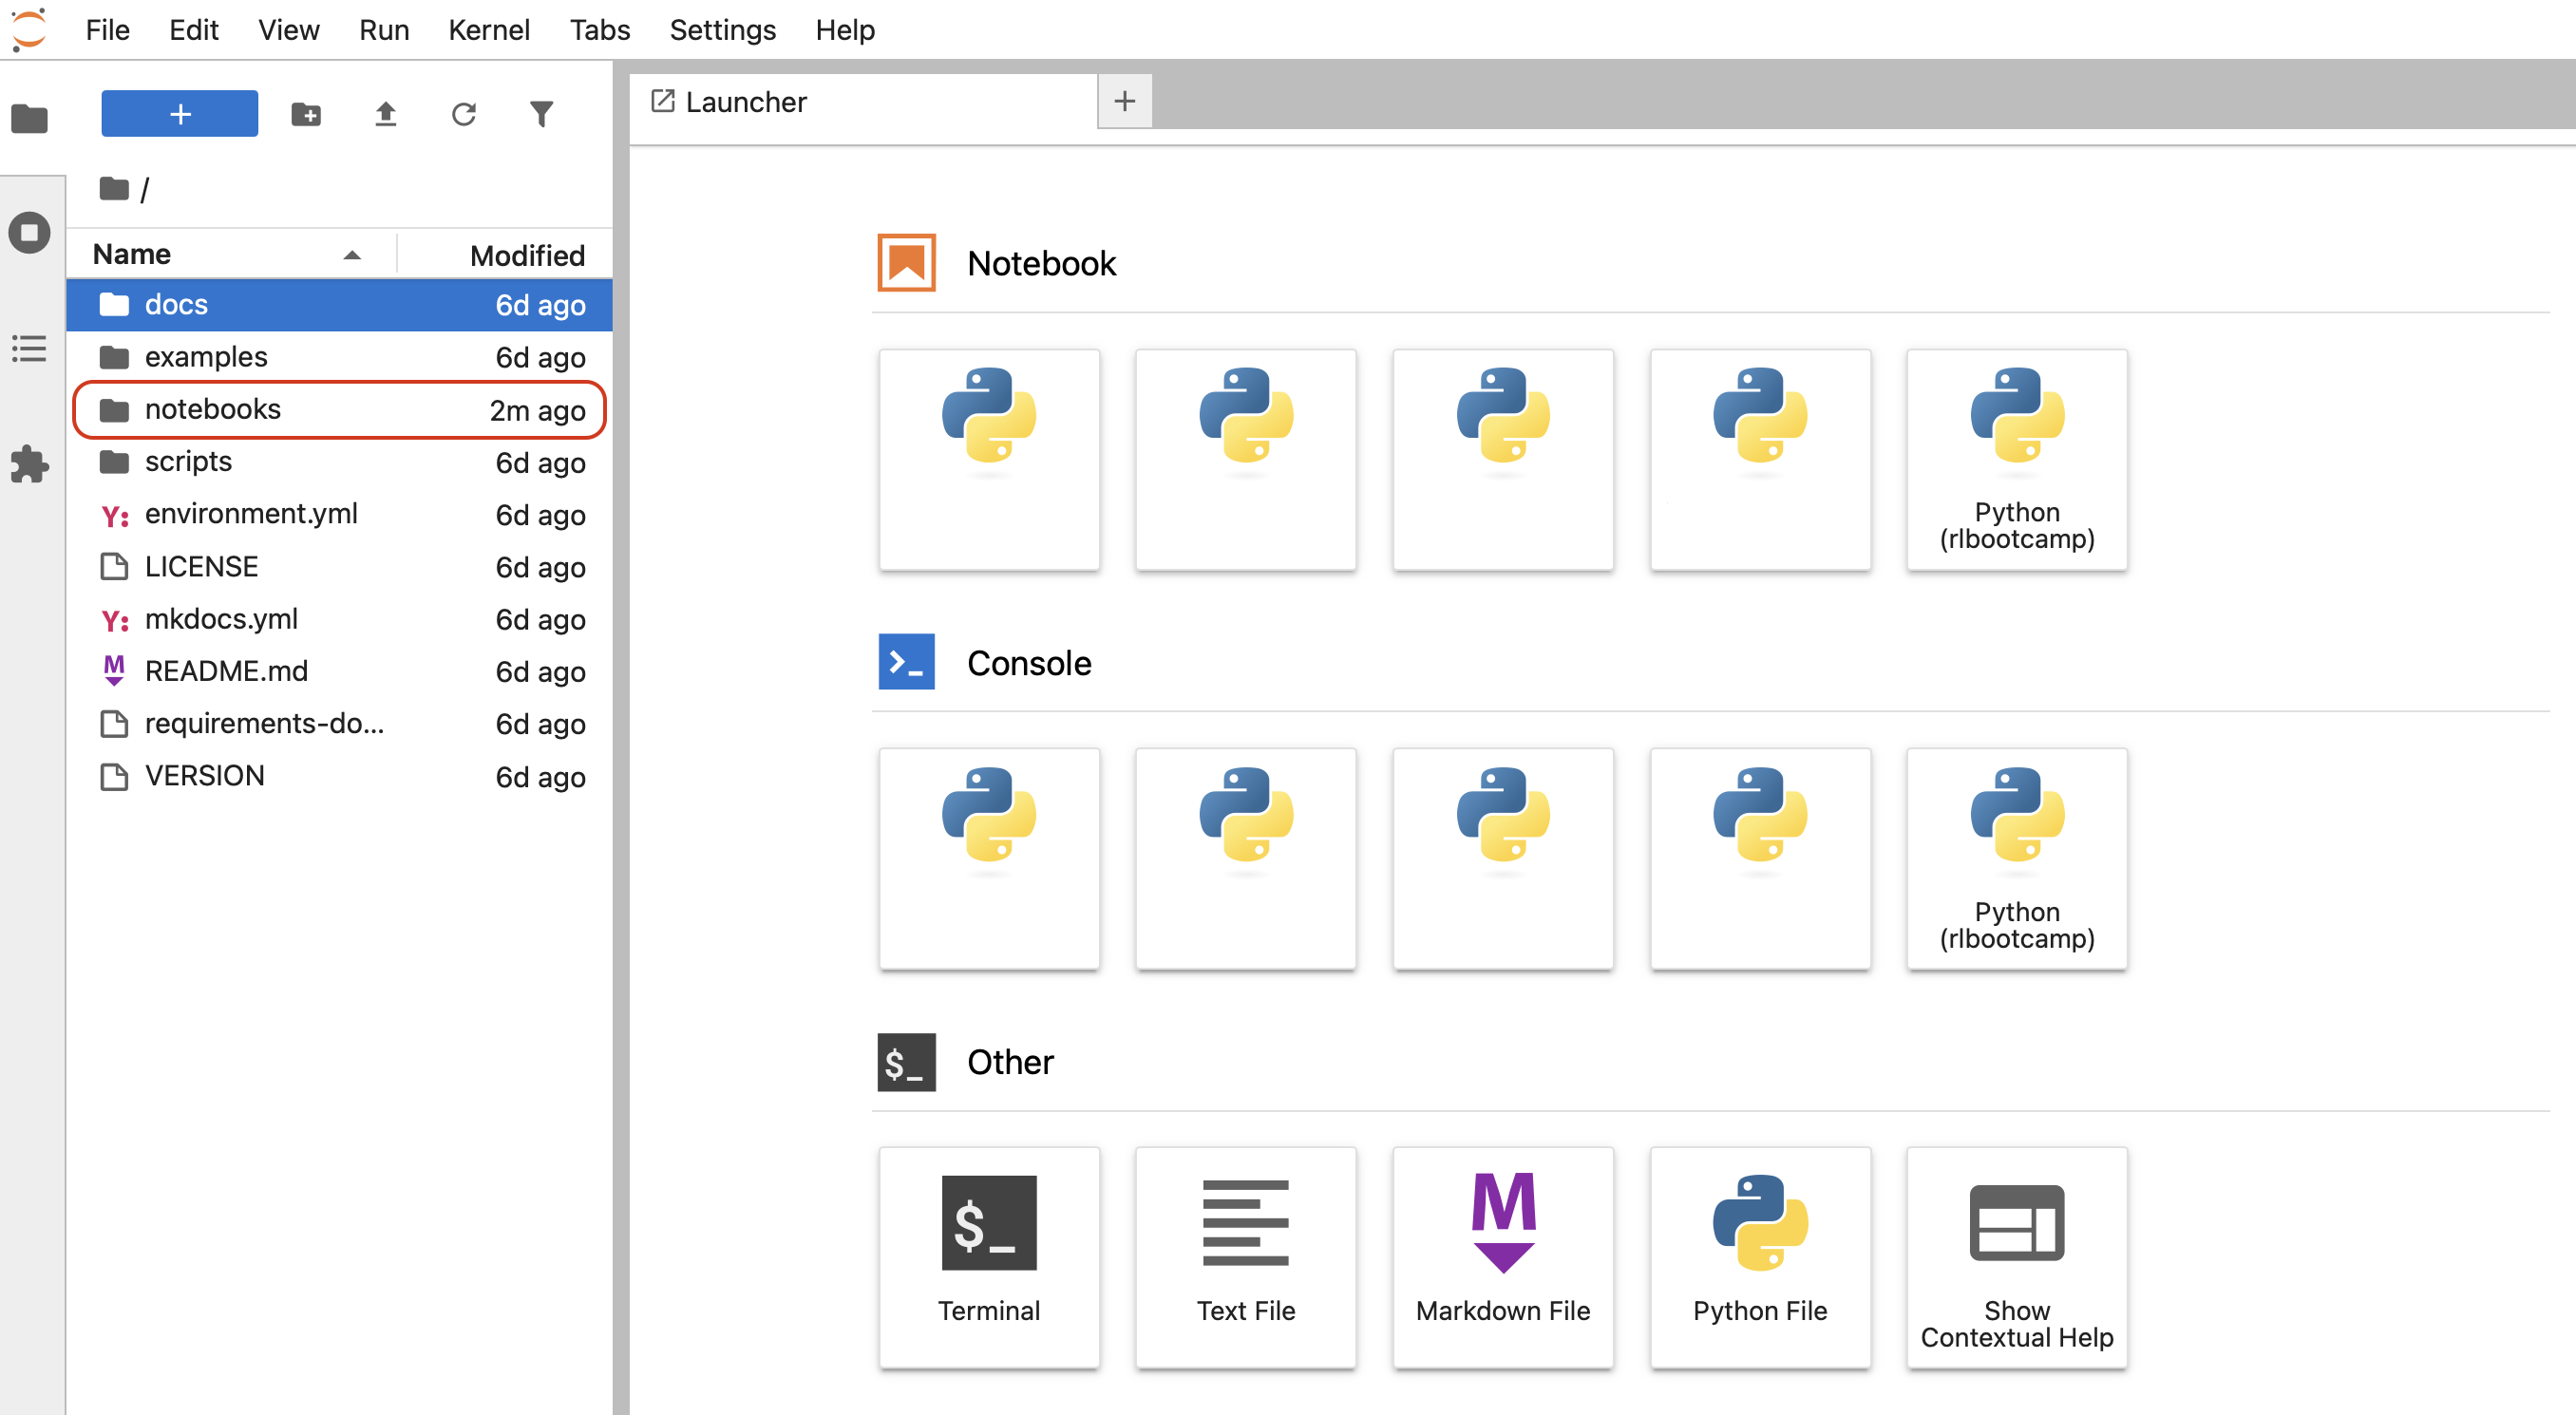
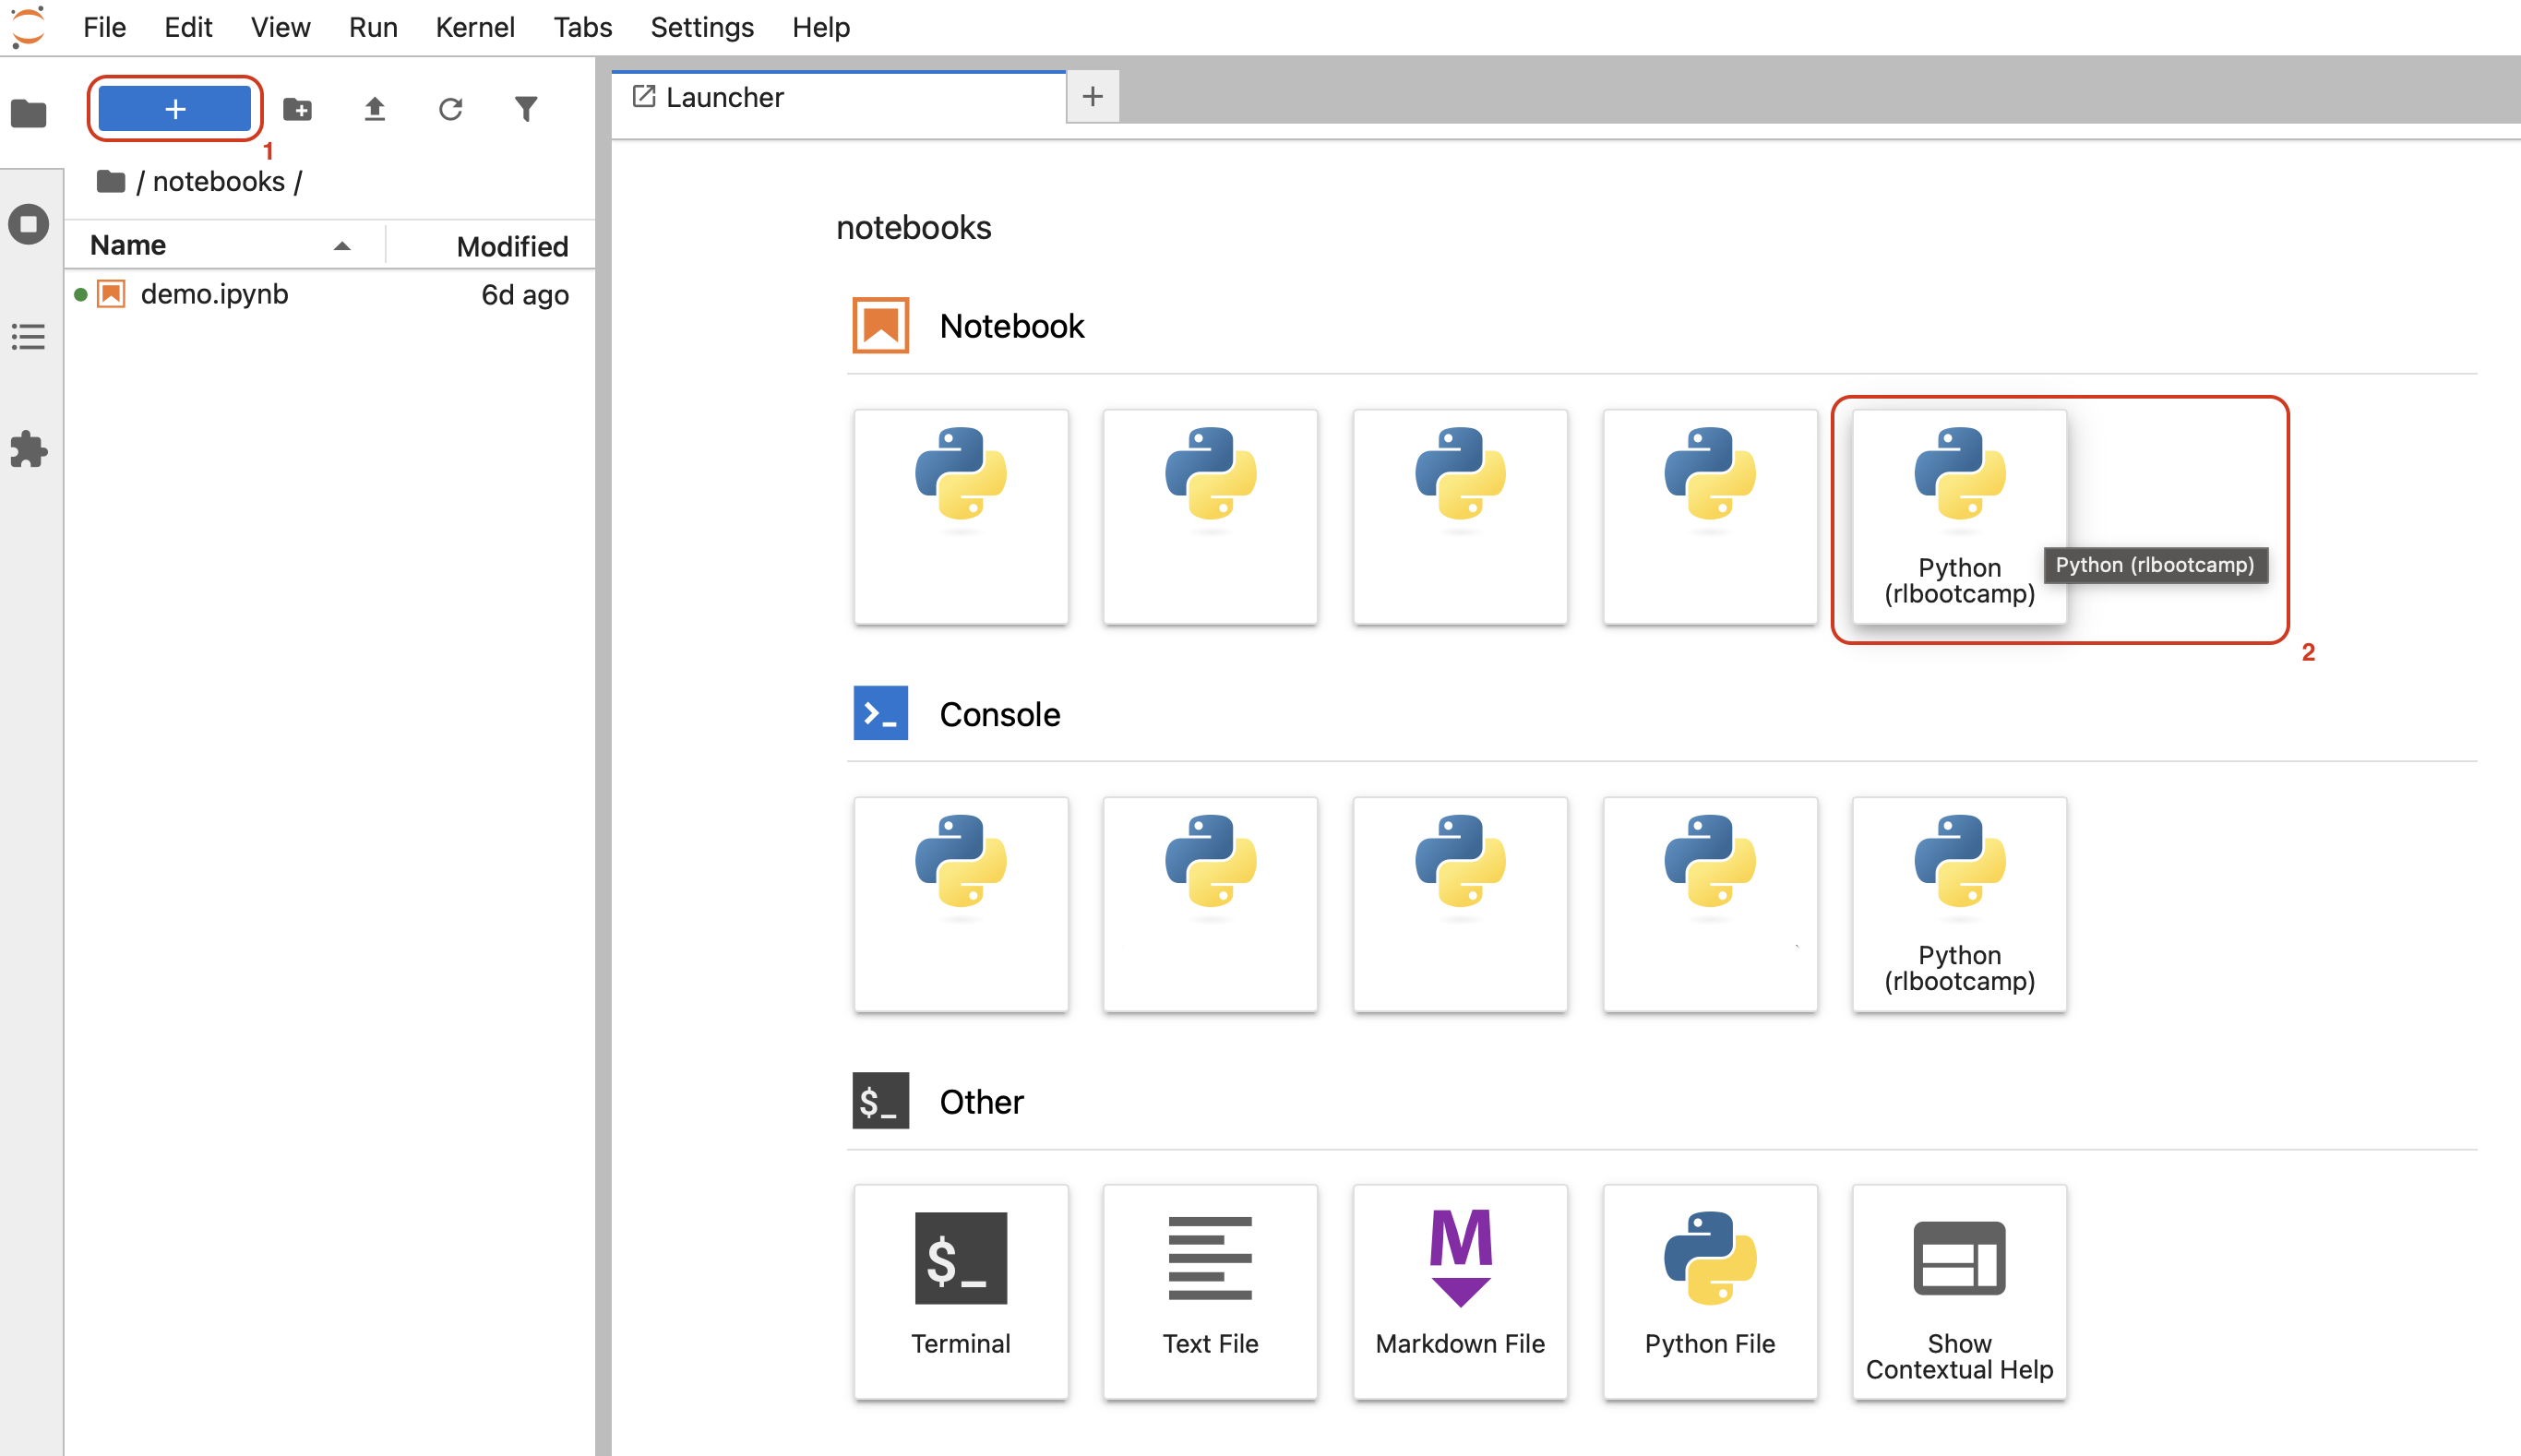
Normally the local jupyter lab page will open by itself. If you are asked to select a kernel right away just choose Python (rlbootcamp). Otherwise navigate to notebooks, click the blue button on the top of the page and choose the launcher Python (rlbootcamp) below Notebook. Done the kernel is selected for your notebook.

10. Run the official smoke test
Run this command from the repository root:
The test independently checks:
- the interpreter and environment;
- all required Python packages;
ffmpegonPATH;- a CartPole classic-control step;
- an
Ant-v5MuJoCo physics step; - a short PPO training run on CartPole.
The important final line is:
Package patch versions and the PPO mean return may differ from screenshots or documentation. A different version number is not a failure; every check must say ok, and the final readiness line must appear.
Save a diagnostic copy of the output if desired:
(rlbootcamp) demo@rl-mac ~/Projects/rl-bootcamp/rl-bootcamp-setup % python scripts/smoke_test.py
[IPKernelApp] WARNING | Kernel is running over TCP without encryption. All communication (including code and outputs) is sent in plain text and is susceptible to eavesdropping. Use IPC transport or launch with kernel manager-provisioned CurveZMQ keys to enable transport encryption.
1. Python interpreter
---------------------
executable : /anaconda3/envs/rlbootcamp/bin/python
version : 3.12.13
platform : Darwin arm64
[ ok ] Python version — 3.12.13
[ ok ] Environment — running inside rlbootcamp
2. Packages
-----------
[ ok ] NumPy — 2.5.1 (arrays and maths)
[ ok ] Matplotlib — 3.11.1 (plots and rendering)
[ ok ] PyTorch — 2.13.0 (neural networks)
[ ok ] Gymnasium — 1.3.0 (the environment API)
[ ok ] Stable-Baselines3 — 2.9.0 (RL algorithms)
[ ok ] SB3-Contrib — 2.9.0 (extra algorithms (masking, TRPO))
[ ok ] MuJoCo — 3.11.0 (physics simulation)
[ ok ] TensorBoard — 2.21.0 (training curves)
[ ok ] JupyterLab — 4.6.2 (running the notebook sessions)
[ ok ] ipykernel — 7.3.0 (the kernel notebooks actually run on)
[ ok ] ffmpeg — found on PATH (saving .mp4 videos)
3. Stepping a classic-control environment
-----------------------------------------
[ ok ] CartPole-v1 — obs shape (4,), reward 1.0
4. MuJoCo physics
-----------------
[ ok ] Ant-v5 — obs shape (105,), action shape (8,)
5. Training (this takes ~15-30 seconds)
---------------------------------------
[ ok ] PPO on CartPole — trained 5k steps, mean return 381
6. Rendering
------------
[ ok ] classic-control frame — CartPole-v1 rendered 600x400 RGB
[ ok ] video export — wrote smoke-episode-0.mp4 (3 KB)
[ ok ] MuJoCo frame — Ant-v5 rendered 480x480 RGB
7. Notebooks
------------
[ ok ] jupyter launcher — /anaconda3/envs/rlbootcamp/bin/jupyter
[ ok ] notebook kernel — runs on this environment's Python
Summary
-------
Everything works. You are ready for the bootcamp.
11. Run the worked example
The worked example follows the same workflow used during the bootcamp: establish a baseline, train an agent, evaluate it against the baseline, inspect the training curve, and watch a recording.
11.1 Measure the random baseline
Pendulum returns are negative. Values closer to zero are better. My output looks like this:
(rlbootcamp) demo@rl-mac ~/Projects/rl-bootcamp/rl-bootcamp-setup % python examples/01_random_agent.py
episode 0 steps 200 return -986.0
episode 1 steps 200 return -969.1
episode 2 steps 200 return -1125.2
episode 3 steps 200 return -1317.7
episode 4 steps 200 return -1599.8
episode 5 steps 200 return -1186.6
episode 6 steps 200 return -1124.9
episode 7 steps 200 return -861.4
episode 8 steps 200 return -833.8
episode 9 steps 200 return -1438.9
episode 10 steps 200 return -1522.9
episode 11 steps 200 return -1352.6
episode 12 steps 200 return -1135.2
episode 13 steps 200 return -1274.8
episode 14 steps 200 return -1566.7
episode 15 steps 200 return -881.1
episode 16 steps 200 return -964.7
episode 17 steps 200 return -1722.9
episode 18 steps 200 return -970.0
episode 19 steps 200 return -1063.2
Random policy over 20 episodes:
mean return : -1194.9
std : 261.1
best / worst: -833.8 / -1722.9
This is the number to beat. Now run 02_train.py.
11.2 Train a 20,000-step SAC agent
This should take roughly 5–10 minutes on a typical laptop CPU. Watch rollout/ep_rew_mean, which should trend upward toward zero. Do not interpret actor or critic loss as if this were supervised learning.
(rlbootcamp) demo@rl-mac ~/Projects/rl-bootcamp/rl-bootcamp-setup % python examples/02_train.py
Using cpu device
Wrapping the env in a DummyVecEnv.
Training SAC on Pendulum-v1 for 20,000 steps
Run directory: runs/sac_Pendulum-v1_20260813_110329
Logging to runs/sac_Pendulum-v1_20260813_110329/SAC_1
----------------------------------
| rollout/ | |
| ep_len_mean | 200 |
| ep_rew_mean | -1.37e+03 |
| time/ | |
| episodes | 4 |
| fps | 145 |
| time_elapsed | 5 |
| total_timesteps | 800 |
| train/ | |
| actor_loss | 22.4 |
| critic_loss | 0.272 |
| ent_coef | 0.812 |
| ent_coef_loss | -0.341 |
| learning_rate | 0.0003 |
| n_updates | 699 |
----------------------------------
...
---------------------------------
| rollout/ | |
| ep_len_mean | 200 |
| ep_rew_mean | -326 |
| time/ | |
| episodes | 100 |
| fps | 128 |
| time_elapsed | 155 |
| total_timesteps | 20000 |
| train/ | |
| actor_loss | 43.2 |
| critic_loss | 0.569 |
| ent_coef | 0.0212 |
| ent_coef_loss | -0.0111 |
| learning_rate | 0.0003 |
| n_updates | 19899 |
---------------------------------
Saved model to runs/sac_Pendulum-v1_20260813_110329/model.zip
Inspect the curves with: tensorboard --logdir runs/
Evaluate it with: python examples/03_evaluate.py runs/sac_Pendulum-v1_20260813_110329/model.zip
(rlbootcamp) demo@rl-mac ~/Projects/rl-bootcamp/rl-bootcamp-setup %
When training finishes, locate the saved model:
11.3 Evaluate against the baseline
Replace <timestamp> with the actual directory name printed by the training script:
The output should show the random baseline, stochastic agent, deterministic agent, and the improvement over random. Exact values vary because RL is stochastic.
(rlbootcamp) demo@rl-mac ~/Projects/rl-bootcamp/rl-bootcamp-setup % python examples/03_evaluate.py runs/sac_Pendulum-v1_20260813_110329/model.zip
Pendulum-v1 — 20 episodes
policy mean return std
----------------------------------------------
random baseline -1356.5 289.5
agent (stochastic) -165.2 90.6
agent (deterministic) -167.8 87.3
agent - random = +1188.8
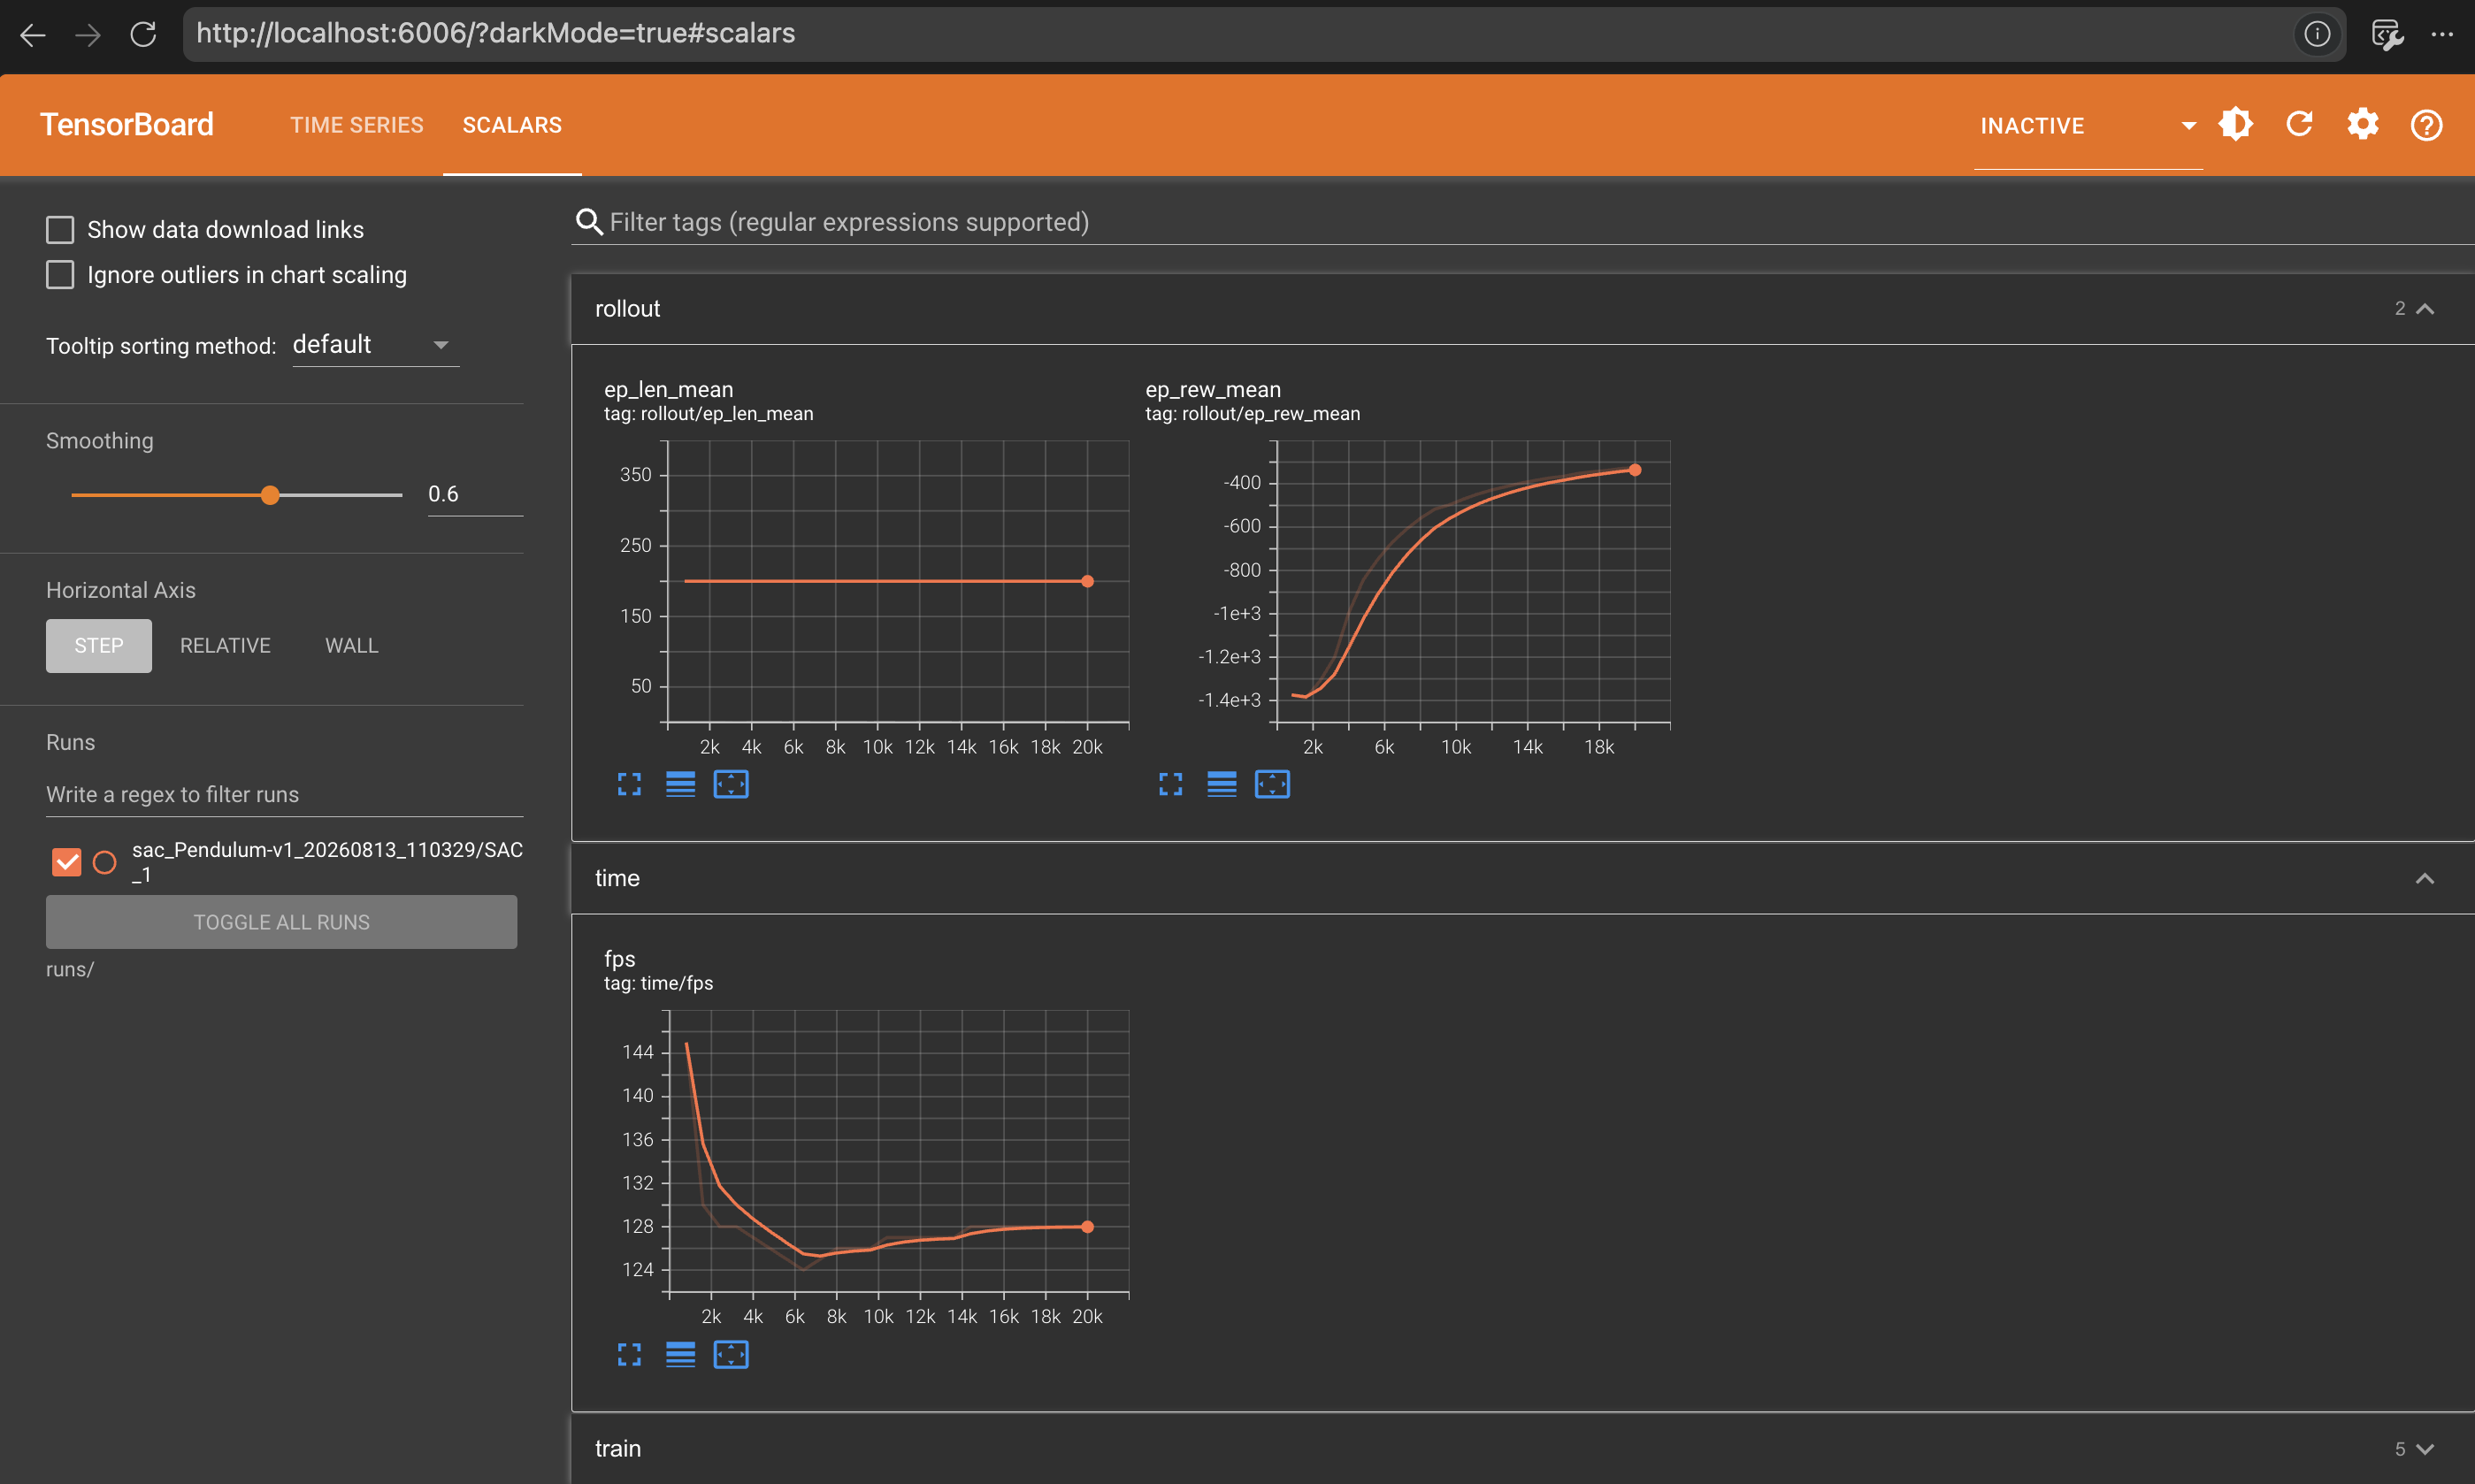
11.4 Inspect the run with TensorBoard
Open a second VS Code terminal, activate the environment, and start TensorBoard:
Open:
The most important plots are:
rollout/ep_rew_meanfor learning progress;rollout/ep_len_meanfor episode length;time/fpsfor throughput;eval/mean_rewardwhen an evaluation callback is used.
Stop TensorBoard with Ctrl+C when finished.
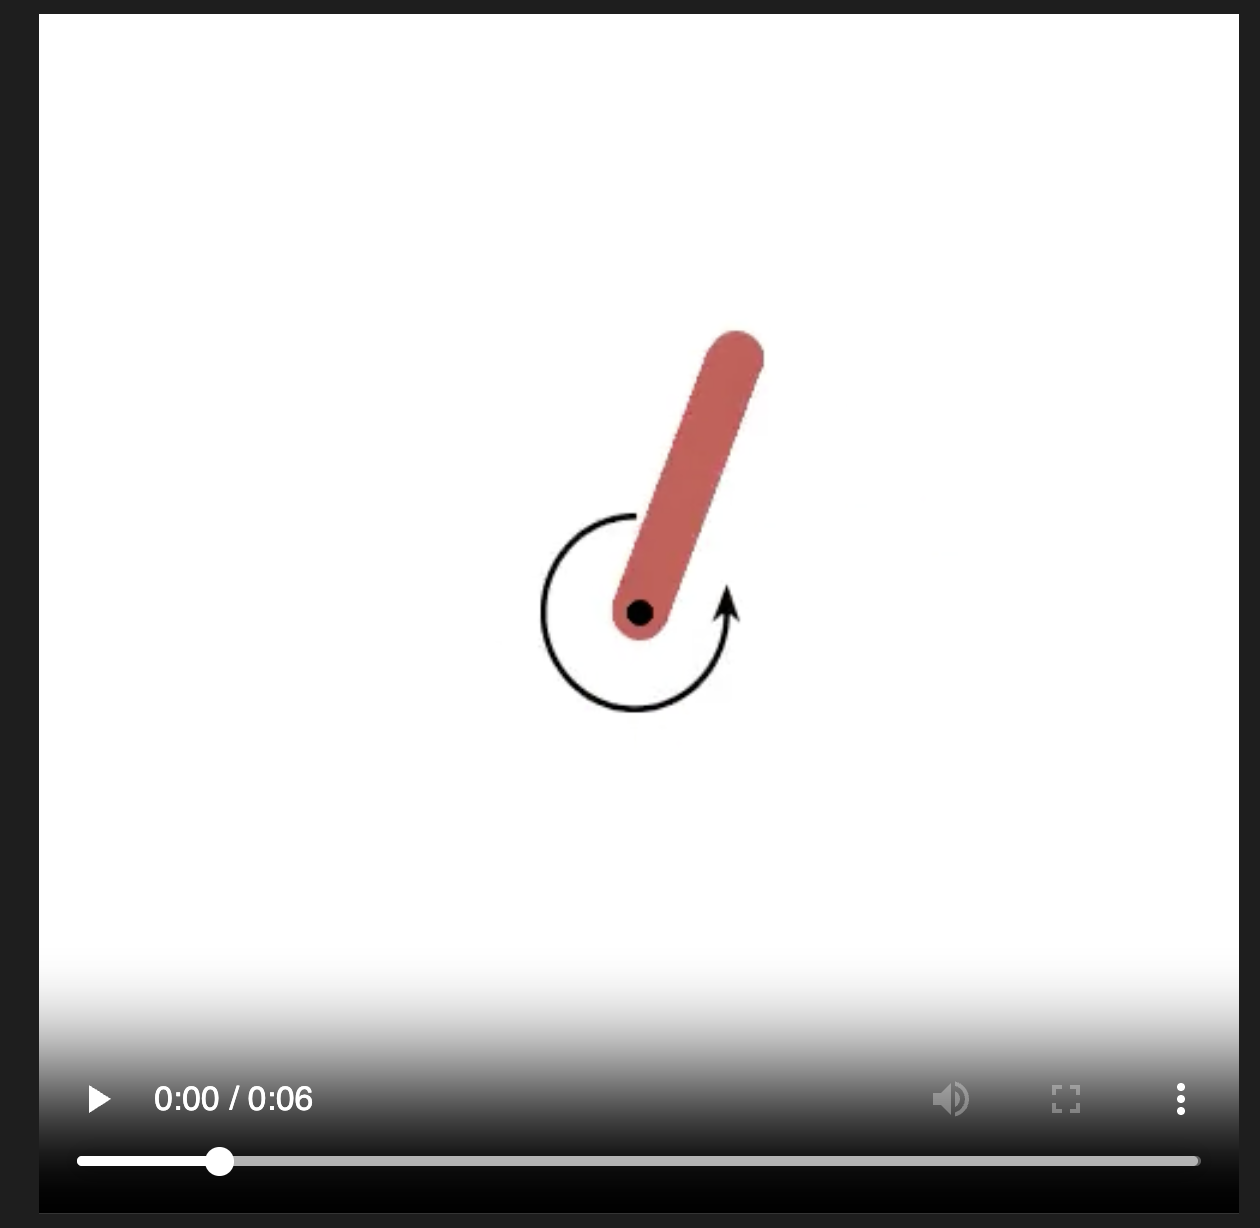
11.5 Record and inspect a video
Replace <timestamp> with the real run directory:
python examples/03_evaluate.py runs/sac_Pendulum-v1_<timestamp>/model.zip --video
find runs -name '*.mp4' -print
Open the path printed by find or open it via click within the repo:
Optional hard-start swing-up recording:
python examples/03_evaluate.py runs/sac_Pendulum-v1_<timestamp>/model.zip \
--video --start-hanging --video-name pendulum-swingup
12. Optional longer training run
The official worked example suggests 100,000 steps for a more complete run:
This may take about 30 minutes. It is optional for verifying the installation; the smoke test and 20,000-step worked example are sufficient for setup readiness.
To compare with PPO instead of SAC:
13. Final readiness checklist
Before the bootcamp, confirm every item:
-
uname -mprintsarm64. -
conda infoshowsplatform : osx-arm64. - The repository is stored in your chosen local project folder.
-
conda activate rlbootcampsucceeds. - Python is 3.12.x and its path contains
envs/rlbootcamp. - VS Code uses the
rlbootcampinterpreter. - VS Code notebooks use the
Python (rlbootcamp)kernel. -
python scripts/smoke_test.pyends with the readiness message. - The random baseline script runs.
- The training script creates a model under
runs/. - The evaluation script compares the model with the random baseline.
- TensorBoard opens at
http://localhost:6006. - Video export produces an
.mp4file.
14. Update the repository and environment the night before the event
From the repository root:
git status --short
git pull --ff-only
conda env update -n rlbootcamp -f environment.yml --prune
conda activate rlbootcamp
python scripts/smoke_test.py
Do this before the event rather than during the first hands-on session.
15. Targeted troubleshooting for this setup
ModuleNotFoundError in VS Code
Check both the terminal and VS Code interpreter:
echo "$CONDA_DEFAULT_ENV"
python -c "import sys; print(sys.executable)"
conda run -n rlbootcamp python -c "import sys; print(sys.executable)"
Both Python paths should point to the rlbootcamp environment. Reselect Python: Select Interpreter, then open a new integrated terminal.
Python prints x86_64 on an Apple Silicon Mac
If macOS reports arm64 but Python reports x86_64, the conda installation or environment is running through Rosetta. Use the native Miniforge recovery steps in section 3 and recreate the environment.
Environment solving appears stuck
Use the libmamba solver:
If the environment already exists, update it instead:
ffmpeg is missing
Classic-control video says pygame is missing
MuJoCo import or Ant-v5 fails
First update from the official environment file:
If the specific extras are still missing:
conda activate rlbootcamp
python -m pip install "gymnasium[mujoco]" "mujoco>=3.0"
python -c "import gymnasium as gym; env=gym.make('Ant-v5'); obs, info=env.reset(seed=0); print(obs.shape); env.close()"
Modern MuJoCo 3.x does not require a separate mjkey.txt, a manual MuJoCo binary download, or old mujoco-py environment variables.
MuJoCo rendering produces a GLFW error or black window
Try the native GLFW backend in a focused MuJoCo render test:
MUJOCO_GL=glfw python -c "import gymnasium as gym; env=gym.make('Ant-v5', render_mode='rgb_array'); env.reset(seed=0); frame=env.render(); print(frame.shape); env.close()"
Also recheck that Python reports arm64.
Create a diagnostic report for the organisers
Run from the repository root:
sw_vers
uname -m
conda info
conda run -n rlbootcamp python -c "import platform, sys; print(platform.machine()); print(sys.executable)"
conda run -n rlbootcamp python scripts/smoke_test.py
Send the entire output, not only the last error line. Include the macOS version, state that this is an Apple Silicon Mac, and say whether the commands work in Terminal but fail only in VS Code.
Last resort: recreate only the bootcamp environment
Warning: The next command deletes the
rlbootcampconda environment and packages installed only inside it. It does not delete the cloned repository, source files, or run outputs. Use it only after saving any environment-specific work and after the update command has failed to repair the environment.
conda deactivate
conda env remove -n rlbootcamp
conda env create -f environment.yml
conda activate rlbootcamp
python scripts/smoke_test.py